Thứ Năm, 14 tháng 12, 2006

On the 14th Day of Quilling - Spreuer Tree


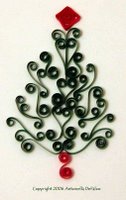
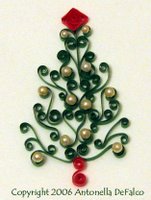
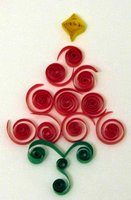
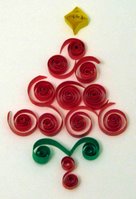
On the 14th Day of Quilling we made a Spreuer Tree and decorated it with some lights.

The pattern for today is a very simple tree with a splash of gilded lights using the Spreuer technique. For this project I started wrapping in the center and then wrapped to the right and then the left. You will see me write R or L to indicate this, please remember that it will turn out the same if you go the opposite sides as long as they are even and you continue to alternate. I am providing my instructions this way, because I needed to pick a direction.

For the basic tree, do the following:
  • You will need approximately 24 inches (60.96 cm) of 1/8 inch (.3cm) wide strip
  • Start 15 - 15 - R13 - L13 - R13 - L13 - R13 - L13 - R13 - L13 End
  • You will notice that I did 2 times around the center 15 to create the tree trunk, and then continued to make the remainder of the tree by alternating along the 13th tooth.

To make the lights I used 1/16 inch (.15 cm) wide strip
  • I simply wrapped it around the tree 3 times and glued it to the back at the top and bottom
  • For added support I glued at a few points to anchor it to the tree
  • 6 - 3 inch (7.62 cm) 1/16 inch (.15 cm) teardrops for the lights

Finally, 1 - 3 inch (7.62 cm) diamond for the star at the top.

The trees themselves are relatively quick to make. The lights can take a little bit of time. I took my 1/8 inch (.3 cm) strips and cut them in half to get the 1/16 inch (.15 cm) wide strips.

Enjoy!
Copyright Antonella DeFalco

Technorati Tags: , , , , , , , , ,

On the 13th Day of Quilling - Triangle Trees

quilled triangle christmas tree
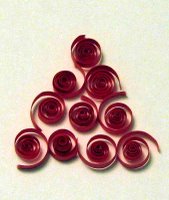
On the 13th day of quilling we made something really simple... Triangle Christmas trees.

If you have ever done any scrapbooking or paper crafting, chances are that you will have run across one or more variations of this design. It is one of the simplest tree designs out there and it uses the rule of threes. Quite simply you take 2 triangles, each progressively larger than the last and construct a tree.

For this particular set of trees I used the following:
  • 1 - 6 inch (15.24 cm) coil triangle
  • 1 - 12 inch (30.48 cm) coil triangle
  • 1 - 24 inch (60.96 cm) coil triangle

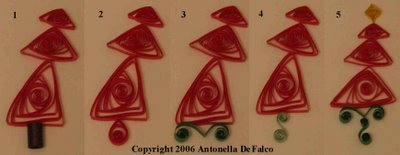
You will see that the picture I have attached shows 5 different variations of the tree.
Tree 1:
  • 1- 3 inch (7.62 cm) tight coil
  • I used 3/8 inch (.95 cm) width paper
Tree 2:
  • 1 - 6 inch (15.24 cm) teardrop
Tree 3:
  • 1 - 4 inch (10.16 cm) V-scroll
Tree 4:
  • 1 - 3 inch (7.62 cm) S-Scroll
Tree 5:
  • 1 - 6 inch (15.24 cm) diamond scroll
  • 1 - 4 inch (10.16 cm) V-scroll
  • 1 - 3 inch (7.62 cm) S-Scroll
See the pictures for placement and to see the various options.

Enjoy!
Copyright Antonella DeFalco

Technorati Tags: , , , , , , , ,

Thứ Tư, 13 tháng 12, 2006

On the 12th Day of Quilling - Spreuer Cross


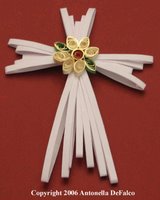
On the 12th Day of Quilling we made a Spreuer Cross.

Click for help on Spreuer Instructions. For this project I started wrapping in the center and then wrapped to the right and then the left. You will see me write R or L to indicate this, please remember that it will turn out the same if you go the opposite sides as long as they are even and you continue to alternate. I am providing my instructions this way, because I needed to pick a direction.

The fun thing about Spreuer is that it is really a lot of fun and just like all quilling, it is something you can experiment with and find new ways to use it... I hope you give this a try!

So, for the cross you need the following:
You need to make 3 of these:
  • Start 6 - R7 - L7 - R8 - L8 End

For the longer part of the cross, make 1 of these
  • Start 12 - R13 - L13 - R14 - L14 - R15 - L15 End

  • Glue the long piece to one of the short pieces (top to bottom)
  • Glue each of the remaining short pieces to either side of where you joined together the top and bottom pieces

Center flower:
  • 6 - 3 inch (7.62 cm) white teardrops
  • 1 - 3 inch (7.62 cm) red loose coil
  • 3 - 3 inch (7.62 cm) green marquis
  • Arrange to make flower as shown
  • Attach to Cross where all pieces are joined together


Enjoy!
Copyright Antonella DeFalco

Technorati Tags: , , , , , , , , ,

Thứ Ba, 12 tháng 12, 2006

On the 11th Day of Quilling - Spreuer Angel

spreuer angel
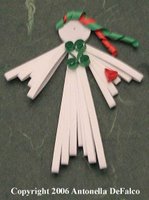
On the 11th Day of Quilling we made a Spreuer Angel.

If you need help, please click for Spreuer Instructions. Please note: I was trying different things when I was trying out how to Spreuer, and for this project I worked from right --> left, and that will be reflected in the numbers I give you.

For this Angel, we do the following:
Wings (make 2 of these)
Wrap your strip, right --> left
Start 8 - 7 - 6 - 7 - 8 End
1 - 3 inch (7.62 cm) coil heart, attach to wing

Bodice (only 1 of these)
Wrap your strip, right --> left
Start 15 - 14 - 13 - 12 - 13 - 14 - 15 End
2 - 3 inch (7.62 cm) S-scrolls to make a Kissing S-scroll, attach to top of bodice

For her face
1 - 24 inch (60.96 cm) tight coil
1 - red and 1 - green approximate 3 inch (7.62 cm) each strip
Start by wrapping the red and green in Spiral shape together, approx 3/4 of the way
For remaining 1/4 of the way Spiral individually
Attach to top of tight coil
Attach face to bodice and wings

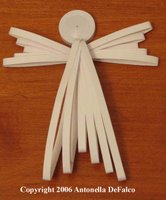
Please use picture for placement and guidance. I have also provided a picture before the decorative elements were placed for assistance.
spreuer angel

Enjoy!
Copyright Antonella DeFalco

Technorati Tags: , , , ,, , , , ,

Thứ Hai, 11 tháng 12, 2006

On the 10th Day of Quilling - Spreuer Instructions


I purchased my onion holder several months ago and have not used it. Since this is a month of trying new things, I thought it was time that I attempted to do some Spreuer work.

Before we can begin with projects, this post will help you with the basic instructions.

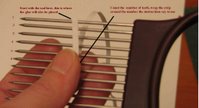
Begin with your onion holder tool. You will see that each tool could have a different number of teeth. The tool I have has 15 teeth, as shown.


To make your spreuer item, follow these basic steps, the pictures will help:
  • Take your strip and with the loose end at the 1st tooth, count down to the number specified in the instructions.
  • With Spreuer, the instructions will provide you with a list of numbers.
  • These numbers correspond to the teeth on your tool.
  • When you get to the number you wrap the strip around that tooth.
  • As you come around the back and over the top, place a dab of glue.
  • If you need more than one strip, I do not glue the 2 together when I start. I wait to see where the strip will end and then cut and glue so that I keep a front and back where all my glue will be.
  • Keep winding until you complete the project.
  • When you are done, glue the final wrapped strip in place and slide it off the tool.
  • Arrange your spreuer items accordingly.

With Spreuer you can make Crosses, Angels, Flowers, Trees... stay tuned to see what we will make :-)

This will get you started. The next few projects will show you some examples.

Enjoy!
Copyright Antonella DeFalco

Technorati Tags: , , , , , , , ,

On the 9th Day of Quilling - Fancy Ornament


A Quilled Christmas Ornament from Antonella at www.quilling.blogspot.com  #Quilled #Quilling #Ornament #Christmas


On the 9th Day of Quilling we made a fancy ornament. Tried to keep this one simple, with mostly loose coil shapes.

To make this project you will need:
  • 4 - 3 inch (7.62 cm) green teardrops
  • 5 - 3 inch (7.62 cm) white teardrops
  • 1 - 3 inch (7.62 cm) red teardrop
  • 3 - 3 inch (7.62 cm) red diamond
  • 5 - 3 inch (7.62 cm) red loose coils
  • 11 - 3 inch (7.62 cm) green loose coils
  • 7 - 3 inch (7.62 cm) white loose coils

When making the ornament, please refer to the picture. Starting at the top and working or way down, do the following:
To make the flower:
  • Place red loose coil and place 5 white teardrops (rounded end glued to red loose coil) to make a star shape.
  • Place 4 green teardrops between white teardrops (pointed end glued to red loose coil)
  • Glue 1 red loose coil to the top of the flower


A Quilled Christmas Ornament from Antonella at www.quilling.blogspot.com  #Quilled #Quilling #Ornament #Christmas

Bottom:
  • Row 1 - Glue 3 green and 3 white loose coils, alternating colors
  • Row 2 - Glue 4 green and 2 white loose coils, alternating colors
  • Row 3 - 4 green loose coils
  • Row 4 - 3 red loose coils
  • Row 5 - 2 white loose coils
  • Row 6 - 1 red teardrop, glue rounded end to row 5


To attach the top and bottom use the 3 red diamond shapes to attach them as shown in the picture.

I hope you like this project.

Enjoy!
Copyright Antonella DeFalco

Technorati Tags: , , , , , , , ,

Thứ Sáu, 8 tháng 12, 2006

On the 8th Day of Quilling - Poinsettia


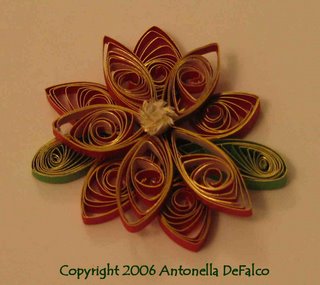
On the 8th day of quilling we made a gilded poinsettia.

The more I use this beautiful gilded paper, the more I love using it. Look at how it adds pop to this poinsettia. This project layers the leaves and the center portion of the poinsettia.

To make this project you need the following:
Start with:
  • 5 - 9 inch ( cm) marquis
  • Place them so that all the points meet in the center

On top of this, layer the following:
  • 5 - red and white marquis
  • 5 - 3 inch white
  • 5 - 6 inch (15.24 cm) red
  • Place the white strip inside the red strip and roll them together. For this project I did not glue the two strips together.

at the very top add
  • 1 - 3 inch (7.62 cm) fringed flower

For the leaves I used
  • 2 - 9 inch ( cm) teardrops
  • Place them where you want. The green adds a nice dash of color.

These are great to adorn your cards, or perhaps turn them into an ornament and hang them from the tree.

Enjoy!
Copyright Antonella DeFalco

Technorati Tags: , , , , , , , , ,

Thứ Năm, 7 tháng 12, 2006

On the Seventh Day of Quilling - Heartthrob Snowman


On the Seventh Day of Quilling we made a Hearthtrhob Snowman. This little guy is ready to go out for a night on the town.

The best part is that anyone can make him.

For the snowman, I used the following:
  • 1 - 18 inch (45.72 cm) loose coil for his head
  • 1 - 24 inch (60.96 cm) loose coil for his center
  • 1 - 36 inch (91.44 cm) loose coil for his bottom

His hat is made with:
  • 1 - 24 inch (60.96 cm) rectangle (the top is more round)
  • 1 - 12 inch (30.48 cm) rectangle for the rim of his hat
  • 2 - 6 inch (15.24 cm) coil hearts added to the hat

For his face:
  • 2 - 2 inch tight coils for his eyes
  • 1 - 3 inch (7.62 cm) long triangle for his nose
  • 3 - 1 inch ( ) tight coil for his mouth

Additional embellishments:
  • 3 - 3 inch (7.62 cm) tight coils for his buttons
  • 1 - 6 inch (15.24 cm) strip fashioned like a scarf
  • 1 - 3 inch (7.62 cm) coil heart attached to the scarf

And there you have it, ready for a night on the town!

Enjoy!
Copyright Antonella DeFalco

Technorati Tags: , , , , , , , , ,

Thứ Tư, 6 tháng 12, 2006

On the Sixth Day of Quilling - Birdhouse


On the Sixth Day of Quilling we made a Birdhouse. As I have mentioned earlier, I really like birdhouses and I love how you can use quilling to dress them up.

This project was especially fun. I have extended the scroll challenge and forced myself to look at them in new and unique ways... I hope you like the way I turned S-scrolls into a pair of love birds for this project.

For this Birdhouse, I started with creating the basic birdhouse shape by taking red paper and decorative scissors and did the following:
  • Cut a 1-/12 inch square for the base
  • Cut another 1-1/2 inch square and cut it in half at an angle to make a triangle for the roof
  • I then took a gel pen and made a dash-dot (-.-.-.) pattern around the outside edge. I did this so that it is easier to see the delineation between the roof and the base. This is a scrapbooking/cardmaking thing.
For the quilling, I used 1/8 inch (.3 cm) wide strips. The instructions for putting together the birdhouse are as follows:
Roof
1 Heart-T-Scroll

  • 1 - 4 inch (10.16 cm) heart scroll
  • 1 - 4 inch (10.16 cm) T-scroll
  • Place T-scroll inside heart-scroll to complete the shape. Glue to the roof.
Base
  • 1 - 3 inch (7.62 cm) coil heart, place between roof and base
  • 1 - 2 inch (5.08 cm) heart scroll, place beneath the love birds
S-Scroll Birds (make 2)
I bet you didn't think that you could make birds from S-scrolls - it is very easy, here is how you do it...
  • 1 - 3 inch (7.62 cm) S-scrolls
  • 1 - 3 inch (7.62 cm) double scroll with no hook (attach it to the bottom part of the S-scroll, it looks like feathers)
  • 1 - .5 inch (1.27 cm) folded for beak, attach to the top part of the S-scroll
  • Look at the picture to see how the pieces fit to get bird shape
  • Place these love birds so that they are facing each other, perhaps they are singing a love song to eachother
This project is simple and easy to make, remember to always stop and break your project down into your quilling shapes.

What I really love about this is that it is an instant ornament for the tree. I find that I like to use birdhouses for new homes or weddings, so if you know someone who recently bought a home or got married this is a great "1st Christmas" ornament for the tree or scrapbook page.

Enjoy!
Copyright Antonella DeFalco

Technorati Tags: , , , , , , , ,

Thứ Ba, 5 tháng 12, 2006

On the Fifth Day of Quilling - Scroll Tree

free quilling christmas tree pattern


On the third day of quilling we will make a beautiful Scrolled Christmas Tree. I love to challenge myself to use a particular shape and today it is the scroll shape. Please refer to my previous Scroll and More Scroll shape instructions for making this tree.

For making this tree I used 1/8 inch (.3 cm) wide strips. For this design you will need the following number of strips:
1 Heart-T-Scroll
  • 1 - 3 inch (7.62 cm) heart scroll
  • 1 - 3 inch (7.62 cm) T-scroll

2 Kissing scrolls
  • 4 - 3 inch (7.62 cm) S-scrolls

Remaining branches
  • 6 - 3 inch (7.62 cm) S-scrolls
  • 6 - 3 inch (7.62 cm) double scrolls

Topper
  • 1 - 3 inch (7.62 cm) red diamond

Trunk
  • 1 - 3 inch (7.62 cm) red S-scroll

To put this tree together, I recommend the following:
  • Place the Heart-T-Scroll down first
  • Line up your 2 kissing scrolls next
  • To keep a straight line, it may be best to work over a piece of wax paper with graph paper underneath. Then you can use the straight lines to make sure your tree is straight.
Along the left side and then the right side, starting at the top, add the following:
  • S-scroll, pointing down
  • Double scroll, pointing up
  • S-scroll, pointing down
  • Double scroll, pointing up
  • Double scroll, pointing down
  • S-scroll, pointing down

See the picture for placement. You can then adorn the tree as in this example with pearls.
free quilling christmas tree pattern

Enjoy!
Copyright Antonella DeFalco

Technorati Tags: , , , , , , , ,

Thứ Hai, 4 tháng 12, 2006

More Quilling Scroll Shape Instructions

The following are some additional Scroll shapes that you can make, they are:
  • Heart-T-Scroll
  • Double Scroll
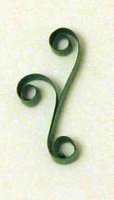
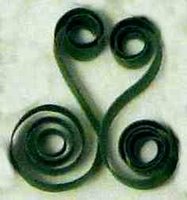
  • Kissing S-Scrolls
(at least that is what I call them)

I recommend that you use the pictures as a guide.

quilling heart t-scroll
Heart-T-Scroll - named because you place a T-scroll into a Heart-scroll.
  • T-Scroll - fold strip in half, glue bottom where fold is, roll the loose ends outward (away from each other). The resulting shape looks like a "T"
  • Heart Scroll - fold strip in half, roll the loose ends toward eachother.
  • For this design, place the T-Scroll in the center and roll the ends of the heart so that the "T" is taller than the heart.
  • To complete this shape, glue the bottom of the "T" to the point of the heart as shown in the picture

quilling double scroll
Double Scroll
  • Fold a strip of paper nearly in half and glue the end where the fold is.
  • Begin rolling the loose ends in the same direction such that one is shorter than the other.
  • Roll the glued end in the opposite direction. Use the picture for guidance.

quilling kissing s-scroll
Kissing S-Scrolls
  • Make 2 S-scrolls and place the scrolls so that they face eachother.
  • The result is a "heart" shape.

Enjoy!
Copyright Antonella DeFalco

Technorati Tags: , , , , , , , ,

Chủ Nhật, 3 tháng 12, 2006

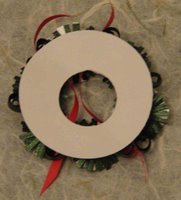
On the Third Day of Quilling - Winter Wreath

free quilling pattern advent wreath
On the third day of quilling we will make a Winter Wreath

In honor of Advent, I thought it appropriate to make a wreath. You can click on Fringed Flowers if you need help with making the flowers.

To start with, I punched a 1-1/2 inch (3.82 cm) circle and then cut the center out. Refer to the photo at the end of this post showing the back of the wreath. For the fringed flowers I used 3/8 inch (.95 cm) wide paper. The shine that you can see in the photos is from the metalic paper that I used.

free quilling pattern fringed flower
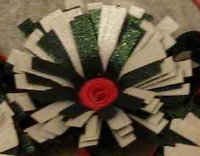
The fringed flower at the top of the wreath is made in the following way:
1 - 3 inch (7.62 cm) tight coil
1 - 3 inch (7.62 cm) White fringed strip
1 - 4 inch (10.16 cm) Green fringed strip
Glue the white and green fringed strips together at one end. At the end that is glued together, glue it to the red strip. Beginning with the red, roll the paper, keeping it tight and gluing it together.
After the glue has dried, place the flower on a hard surface and gently push down on the fringe so that they are

free quilling pattern fringed flower
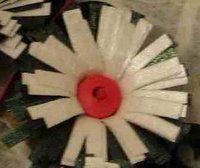
The remaining 5 flowers are arranged around the wreath and are made in the following way:
1 - 3 inch (7.62 cm) tight coil
1 - 2 inch (5.08 cm) White fringed strip
1 - 3 inch (7.62 cm) Green fringed strip
Glue the red, white and green strips together end-to-end Beginning with the red, roll the paper, keeping it tight and gluing it together.
After the glue has dried, place the flower on a hard surface and gently push down on the fringe so that they are spread out as shown.

To fill in the wreath, I did the following:
8 or more - 3 inch (7.62 cm) teardrops that are placed between the fringed flowers to fill in the design.
1 - 3 inch (7.62 cm) heart, see photo for placement
2 - 3 inch (7.62 cm) curled strips (see photo). Cut the ends at an angle, and weave through the wreath for added color

free quilling pattern advent wreath


Enjoy!

Copyright Antonella DeFalco

Technorati Tags: , , , , , , , ,

How to Make Fringed Flowers

fringed flower quillingFor many of my designs, I like to use Fringed Flowers. Early on in my quilling, I found that I liked these flowers. It may have been because they look difficult, however they are easier than they appear.

If you are unsure how to make fringed flowers these instructions are for you. For more information about Fringed Flowers also check out the Basics of Fringe Design and detailed instructions for making fringed flowers. I have included more pictures of fringed flowers so that you can see the effect of using different widths and angles in your cuts.


The important thing to remember with fringed flowers is that the width of the paper that you use is not important. You can use 1/8 in (.3cm), 1/2 in (1.27 cm), 3/8 inch (.95 cm) or any size in between or wider. The difference is in the size of the flower. When deciding what width paper to use, think about the size of your pattern or item that you are quilling and select a width that is in proportion to your project size. The various photos that I have shared show you how different each quilled flower can look. The possibilities are endless.

There are machines called "fringers" that will fringe your paper for you. I do not use one, instead I hand fringe my strips. These instructions are provided for those of you who are hand fringing your paper.

The tools that I use are small scissors (these can be craft scissors, nail scissors, or childrens scissors). I recommend something that has a nice sharp cut. Since many of you have nail scissors, start with those. If you are a paper piecer, then you already have the appropriate tools.
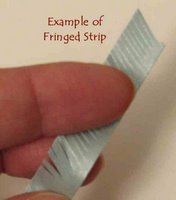
fringed flower quillingTo start, take your scissors and cut tiny cuts approximately 3/4 of the way through the width of the strip. It looks something like this ||||||||||||||||||||||||, please refer to the picture for a close up of an actual fringed strip. The closer (or thinner) you make your cuts, the more delicate the flower will look.
fringed flower quilling
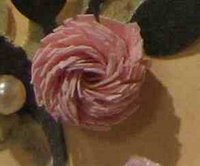
After you have cut your strip, you can begin making your coil. Referring to this picture, if you start your coil using the strip that has been cut, your flower will look like this. For this flower, I did not press the fringed pieces down. They naturally lined up this way because I cut my fringes at a slight angle.
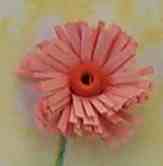
fringed flower quillingIf instead, you add a strip of uncut paper and glue it to your fringed strip and begin rolling from the uncut paper, it will look like this picture. You may prefer this look or you may make your flowers this way because it is easier to start with the uncut strip, in this case a 1/8 inch (.3 cm) width paper, and make a tight coil at the beginning. This makes rolling the fringed strip which is glued to the uncut paper easier. Once you have rolled and glued the strips and the glue has dried, place the flower on a hard surface and gently press down on the fringes and flatten them as shown in this picture. You can also take your needle tool or a pin and slightly curve the ends for a more rounded look.

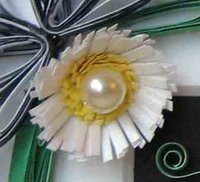
One of my favorite things to do is to add little pearls in the center of my fringed flowers. I think it adds that bit of charm to the overall appearance.

For more information about Fringed Flowers check out the Basics of Fringe Design and instructions for making fringed flowers.


fringed flower quillingEnjoy!

Copyright Antonella DeFalco


Technorati Tags: , , , , , , ,

Days of December Quilling

Happy Holidays! As my special treat in December I am posting a "Quilling A Day" until the 25th of December.

If you are new to quilling,
please click to learn the basics of quilling and to learn to make the basic quilled shapes that are assumed you know how to do in creating many of these designs.

The designs will be predominantly focused around the Holidays and I will attempt to make something for everyone. Please check back here for the list of items that have been done so far:

  • Day 1 - Loose Coil Christmas Tree - very easy Christmas Tree design, can be done by children and adults alike.
  • Day 2 - Birdhouse of Love - combines paper piecing with quilling to create a one-of-a-kind winter white and green birdhouse.
  • Day 3 - Winter Wreath - in the spirit of Advent, I have created a wreath to share. This design uses fringed flowers.
  • Day 4 - More Scroll Shapes - I describe the Heart-T-Scroll, double scroll, and Kissing S-Scroll shapes. These are shapes that you will need for the next few days of projects.
  • Day 5 - Scroll Christmas Tree - I love the look of this tree. It is made using S-scrolls, a Heart-T-Scroll, double scrolls and kissing s-scrolls. This project will be available for a limited time.
  • Day 6 - Love Bird Birdhouse - This one has a new design of mine, my S-scroll love birds, check them out.
  • Day 7 - Heart throb Snowman - This guy is all dressed up and ready for a night on the town
  • Day 8 - Gilded Poinsettia - this gilded paper makes this poinsettia breath taking
  • Day 9 - Fancy Ornament - this is a small ornament for your scrapbook Christmas layout, or Christmas cards, or possibly for your tree
  • Day 10 - Spreuer Instructions - you've heard about it, now you can see what it is all about
  • Day 11 - Spreuer Angel - A sweet Christmas Angel using the Spreuer technique
  • Day 12 - Spreuer Cross - A lovely Cross using the Spreuer technique
  • Day 13 - Triangle Christmas Trees - basic design, using triangle shaped coils to make trees
  • Day 14 - Spreuer Tree - a very clean, basic Spreuer tree with lights and a star on top
You can find more Free Patterns if you are interested. As always, send me comments with ideas or suggestions for information, tips, or patterns that you would like to see.

Important note: These items will remain posted until after the holidays, at that time, I may take some of the free instructions that have been posted and remove them.


Technorati Tags: , , , , , , ,

Enjoy!

Copyright Antonella DeFalco

Thứ Bảy, 2 tháng 12, 2006

On the Second Day of Quilling

free quilled birdhouse pattern quilling
On the second day of quilling we Adorned a Birdhouse.

This will not be the only birdhouse that we see during this Quilling month of December.

For this Birdhouse, I started with creating the basic birdhouse shape by taking green paper and decorative scissors and did the following:
  • Cut a 1-/12 inch square for the base
  • Cut another 1-1/2 inch square and cut it in half at an angle to make a triangle for the roof
  • I then took a gel pen and made a dash-dot (-.-.-.) pattern around the outside edge. I did this so that it is easier to see the delineation between the roof and the base.

I had some new English quilling paper that has a beautiful gilded edge. I love it, it is so beautiful and I will tell you that the pictures don't do it justice.

The next step is to make quilling to adorn our new birdhouse. For this design, I used a shape called a "flag" that I have not previously described. Use this picture as your guide and do the following:
quilling shapes

  • Take your strip of quilling paper (width does not matter) and fold it in half length-wise
  • Do not glue the strip
  • Starting from the end that is open, start a coil
  • You only want to make a few turns and as you turn you will see the end where the fold is will start to push out, like a flag


The instructions for putting together the birdhouse are as follows:
Roof
  • 3 - 3 inch (7.62 cm) teardrops
  • 1 - 3 inch (7.62 cm) flag
  • Arrange the 3 teardrops with points glued together and attach flag to the glued points
  • 2 - 3 inch (7.62 cm) S-scrolls are added for additional decoration
Base
  • 1 - 9 inch (22.86 cm) tight coil
  • 4 - 3 inch (7.62 cm) heart scrolls
  • Arrange as shown in picture
This would look great on a card or if you add a hook you can make it an ornament to hang on your tree.

Technorati Tags: , , , , , , , ,


Enjoy!

Copyright Antonella DeFalco

Thứ Sáu, 1 tháng 12, 2006

On the First Day of Quilling

Welcome to our First Quilling Pattern!

For today's quilling we will make your basic open coil Christmas tree. This is a staple that everyone should know how to make because it is so simple and quick to make that if you needed to make a quick Christmas card in a pinch, this is probably what you put on it.

I decided that green Christmas trees are overrated, so today we will make some neat red trees.

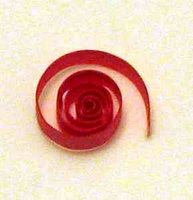
The tree itself is made with 10 open coils. You make the open coil by winding your paper and then releasing it when you get to the end of the strip. It is an open coil because you do not glue the end. This is a picture so that you can see what it looks like.
free pattern quilling open coil

I like working with 3 inch (7.62 cm) strips. The reality is that you can use any size strip you would like. You can make the tree smaller or larger by changing the strip length or by adding more rows of open coils. In the basic design I am sharing with you today, I selected a 4 row tree with the following:
  • Row 1 (top) - 1 open coil
  • Row 2 - 2 open coils
  • Row 3 - 4 open coils
  • Row 4 (bottom) - 5 open coils

You simply add one more coil than the previous row for each new row you add. Here is a picture of the basic tree.
free pattern quilling quilled christmas tree

In this first tree that I made, you will see that I tore the ends. Although this is perfectly acceptable, I find that when using open coils I like a more clean look. You will see in the additional pictures, I have created trees where I have cut the end at an angle.

The two additional trees that I have included, have some finishing touches added to them.
free pattern quilling quilled christmas tree


You will see that I started with the Open Coil Christmas Tree instructions above. To this tree I have added the following:
  • 1 - Diamond Star - 3 inch (7.62 cm) Diamond
For the trunk of the tree I have used
  • 1 - 3 inch (7.62 cm) V-Scroll
  • 1 - 3 inch (7.62 cm) S-Scroll

For those of you visiting for the first time, you can find the instructions for the Coil and Scroll shapes by clicking the links.


Here is a picture of the Christmas Tree I added to my Christmas cards last year.
free pattern quilling quilled christmas tree
A word of advice. The open scrolls are quite delicate when mailing. The open end will get squished unless you carefully package it. This is why I usually hand deliver my quilled cards, but on those occasions I have to mail them this is what I try to do. I buy a padded envelope (or use bubble wrap). I take 2 pieces of cardboard, one for the top and bottom to stabilize the card so it doesn't bend in the mail. I then will make at least 4 tight coils. It is important that the width of these tight coils is bigger than the height of your quilled piece. I then place one piece of cardboard on the back of the card. For the piece on the front, I glue the tight coils to the other piece of cardboard, taking care to align it so that it does not touch my quilled design. I then place this in the envelope and mail it. I take this special care particularly if I have made something that is more delicate, like these open coils or fringed flowers.

Have fun with this, and remember to experiment!

Technorati Tags: , , , , , , , ,


Enjoy!

Copyright Antonella DeFalco

Labels

Accessories Adult English afghan afghan stitch AGULHAS Amigurumi amirugumi Ảnh anniversary applique Art artist artist trading card Árvore de Natal em croche atc autumn basket award Ẩm thực baby crochet Baby Dress baby knitting Baby learn back to school bag Bags BAKTUS Ballet Bun Cover balloons BARRADOS Bead Beads Bear Ear Hat BEBÊS belts Berry bird birdhouse birthday card blanket blog candy BLUSAS BOINA BOLEROS BOLSAS books booties BORBOLETAS bouquet bows boxes boy card bracelet breast cancer bridal shower bunny Búp bê butterfly CACHECOL CACHECOLAR cake calendar candles candy Candy Cane capilano suspension bridge card card drive card making Cards cards for kids carving carving fruit carving fruits CASACO INFANTI CASACOS CASAQUINHO EM CROCHE CASAQUINHO EM TRICO CASAQUINHO PARA BEBÊ Cắm hoa Cắt may CHAPEU cheerleader childrens crafts christmas quilling clay COLAR COLAR DE FLORES COLETE coloring copyright CORDÃO corned beef CORUJUINHAS crafts CROCHE COM SAQUINHOS PLASTICOS CROCHE IRLANDES crochet Crochet Geek crochet pattern cross cross stitch Curtain cutting paper daisy DECORAÇAO Detail crochet - Móc chi tiết Dicionário de Trico - Inglês/Portugues Doily Doll Dolls dress Đan len earring easter easter card ECHARPE embellishment Embroidery ENXOVAL PARA BEBÉ ESTOLAS explosion gift card holder FAIXA PARA CABELOS fashion fathers day Felt filigrana Floral crochet - Móc hoa FLORES flower flower arrangement flowers crochet Folding paper FOLHAS food food decor frances shilliday free atc pattern free easter pattern FREE FORM free gift free instructions free pattern free quilling instructions free quilling pattern free rice free spreuer patterns fringed flower frustration fun facts Funny Galaxy Stitch Gang tay - Tất garden Gấp giấy Gấp hộp Gấp khăn - Trang trí món ăn gel grips Giầy - Dép gift gift card holder Gifts giveaway glass gloves Gói quà - gấp nơ golf GOLINHAS Google+ GORRO Gối cho bé graduation card GRÁFICOS Granny Square grape roll Hair hair clip halloween happy birthday hat hats heart Hexagon history holiday craft holiday crafts home and garden Hook Itunes jewelery jewelry Kết hạt Khăn - Mũ kirigami kite fold Knit knitting knitting pattern knot ladybug Làm + Trang trí bánh Làm đẹp Làm đồ chơi làm đồ chơi từ gỗ Làm hoa giấy Làm hoa nhựa Làm hoa vải Làm thiệp LEAVES lions gate bridge Log Cabin Square Love luck of the Irish LUMINÁRIAS LUVAS LUVINHAS PARA BEBÊ Magazine magnolia stamp make it monday make up making flower making flowers Making toys mandala Manta MANTA PARA BEBÊ MANTA PARA SOFÁ Mẫu móc Mẫu đan chi tiết Mẫu móc mẫu móc chi tiết Mẫu móc hoa MEUS MOMENTOS MEUS TRABALHOS Michelle Ewart mittens Móc khăn trải bàn Mothers Day motif Multiples myths Nail art naqg necklace needle tool Nghệ thuật Nghệ thuật cắt giấy Nhà đẹp one world one heart Origami owl owoh Pachwork painting Painting - Vẽ PANTUFAS PAP Paper paper filigree paper quilling paper tag paper weight Patchwork patriotic peg PELERINE photograph Phông nền làm ảnh pictures Pillows pink artist pink artist parade of squares pink dogwood pink flamingo pinwheel plastic POLAINA poncho Popcorn puff stitch pumpkin pumpkin cap QUADRADO quilled angel quilled c-scroll quilled coil heart quilled cross quilled double scroll quilled dress quilled eye shape quilled flower girl dress quilled flowers quilled heart quilled heart scroll quilled loose coil quilled loose scroll quilled marquis shape quilled open coil quilled open heart quilled ornament quilled palm tree quilled raindrop shape quilled s-scroll quilled snowflake quilled snowman quilled spiral shape quilled teardrop shape quilled turkey quilled valentine quilling quilling coil shapes quilling double scroll quilling instructions quilling paper quilling pattern quilling shapes quilling strips quilling supplies quilling tools Quilt RECEITA RECEITA CULINÁRIA RECEITA DE PONTOS recycle recycling RENDA DE PELO DE CABRA repair work ribbon rings rugs SACOLAS SAIAS DE CROCHE SANDÁLIAS EM CROCHÊ SAPATINHOS SAPATINHOS PARA BEBÊ Scarf scarves Scarves - Khăn scrapbooking scroll shapes sewing shawls shoes and sandals Singing skirt slippers slotted tool small kite fold snood Snowflake soap socks spiral rose spreuer spreuer flower spring SQUARE st patricks day Strawberry SUÉTER summer tag sweater Swiffer Sweeper Cover TABELAS DE MEDIDAS DE TRICO E CROCHE tablecloths tagged TAPETES. RECEITA tarjetas tea bag folding tea bag folding history teabag folding teabag folding history TENIS PARA BEBÊ Tết dây Thank you thanks thanksgiving quilling Thêu Tỉa hoa quả tight coil tight roll tip tips TOALHAS Tóc đẹp TOUCAS TOUCAS PARA BEBÊ Trang điểm Trang trí TRICO Túi xinh TÚNICA tunisian turkey Tutorial Tutorial video underwear Valentine's day valentines crafts valentines heart vancouver Video VÍDEO Video cắt may Video dạy móc video tutorial weaving wedding wedding dress winners winter quilling wood wreath XALE xerox lets say thanks YouTube