Hiển thị các bài đăng có nhãn free pattern. Hiển thị tất cả bài đăng

Thứ Hai, 28 tháng 6, 2010

Graduation Owl Card


Isn't this a really fun card? I had so much fun making it, and can honestly say that I am super proud of what I have created!  The owl is partly inspiration from the wonderful selection of cards out there and a large part from my own imagination and ingenuity.

We are going to a graduation party and I wanted to create something special.  When my husband likes a card that I have made, then I know I have created a good one, and he liked this one (usually what I make is "too girly" for him).  As many things do these days, I began my quest for inspiration and ideas by doing a google search on graduation owl cards... I absolutely love google, don't you :-)

As is the case many times when doing a search, I got completely lost in the search.  Yes, I sometimes strayed from the quest, but eventually I had to call the search quits.  I found so many cards that I liked, but the one that was my inspiration is this card by Sharon Caudle from Gramma's House of Cards, check out Sharon's blog, because she is very talented. 


I know what you are thinking, it is an owl, how different can they all be and how did this inspire the owl I created? Yes, most owls do look the same.  They all have a basically rounded face and short round body.  Some are punched or die cut and many others were stamped.  All this is true.  So what was it that inspired me? I really liked the way the die that she used allowed her to layer her owl.  If you look at the accent paper that she used for the belly and face area it really stands out.

Now, as you may have guessed by the differences with our cards, I don't have an owl punch or die cut... did that let stop me? Of course not, just I had to shake out my brain and get a bit creative. So armed with nothing more than my circle punches and scissors,  I got started.  Oh, and don't forget rummaging through the stash of papers that I have too.  I am convinced that the paper stash is secretly happy when I go rummaging through them because they are tired of sitting around looking pretty and not being used - lol.

If you are interested in the instructions for making this fella, click here for the complete set of instructions.  Due to the number of pictures that I used and the somewhat complex set of instructions I felt it was easier to post them there than here.

I hope you enjoy this card and have a wonderful day!


Enjoy!
Copyright for Personal Use Antonella DeFalco

Thứ Tư, 18 tháng 3, 2009

Free Quilling Pattern Angel

This quilled Angel is very sweet isn't she? She is made using the Spreuer or Onion Holder technique and floats on her very "springtime" colors.
quilling quilled angel spreuer

You can follow these instructions to make her for your very own!

>quilling quilled angel spreuerHead:

2 strips of Pink paper, tight roll
Shape the tight roll by gently pushing center up

Hair (look at closeup to see how hair looks glued and curled):

1 – 6 in (7.6 cm) strip yellow
Glue yellow strip to top of head. Make 2 cuts and curl to give Angel 3 curly Q’s.

Halo:

1 – 3 in (7.6 cm) strip gold for the halo
Glue to back

For Both the Body and Wings, you will use the Spreuer Technique (click link for more information)

General instructions are to Start in the center and wrap your strip to the left then to the right. Continually going back and forth.


quilling quilled angel spreuer
Body (Make 1, look at picture):

Start at 9 – 8L – 8R – 7L – 7R – 6L – 6R – 5L – 5R

Wings (Make 2, look at picture):

Start at 7 – 6L – 5L – 4L – 3L

Embellishments:

I gave her a collar that is made from approximately 1.5 in (3.8 cm) Spiral
She also has a bouquet of flowers with some flourish of green

I placed her on a 3 in x 3 in (7.6 cm x 7.6 cm) square that I punched using a Fiskars Border punch (I loved the punch, but I was so disappointed when the punch broke)

The Quote is from Luciano de Crescenzo:

"We are each of us angels with only one wing,
and we can only fly by embracing one another"


Thứ Năm, 1 tháng 1, 2009

Free Quilling Snowflake Card Pattern

quilled snowflake ornament card


Here it is, the first quilling pattern of 2009! This is a quilled snowflake ornament that is attached to a card. This card doubles as an ornament for a really special treat for the recipient.

quilled snowflake ornament

Let's begin with the snowflake ornament measurements:
  • 1 - 12 inch (30.5 cm) White Tight Roll for the center of the snowflake

  • 5 - 3 inch (7.6 cm) Blue Tight Roll (will go around the center tight roll)

  • 5 - 6 inch (15.2 cm) White Teardrop (this will alternate with the blue tight roll around the center tight roll. The point of the teardrop will be glued to the center tight roll. See photo for placement)

  • 5 - 6 inch (15.2 cm) Blue Tight Roll (will be glued to the top / rounded portion of the white teardrop)

  • 5 - 6 inch (15.2 cm) White Teardrop (will be glued to the blue tight roll along the rounded end)

To make this snowflake sparkle, I used a glitter glue on both the front and back of the snowflake. I applied the glitter to one side at a time and allowed it to dry before turning it over and glittering the opposite side.

All that is left is the find a jump ring and attach it to one of your points and then tie a string to complete the ornament.

Making the Card

  • Start with Blue cardstock (this is a quarter fold size card)

  • Using various sizes of snowflake stamps, stamp snowflakes on card. I used the Tsukineko Silver which gives the card a glittering look.

  • Tear a piece of white glitter paper and attach to bottom of the card to give the appearance of snow.

  • Stamp "Merry Christmas" or "Let it Snow" or some other sentiment.

  • Apply snowflake and snowman punches (or brads if you have them) to give the card a layered look.

  • Attach the snowflake ornament from above and you are finished.

There you have it. A cute snowflake ornament and card, the winter theme can be used for any occasion during the winter months.

Thứ Hai, 29 tháng 12, 2008

Free Flower or Floral Patterns


Wow! Can you believe how many patterns I have posted on this site? I know that I can't.

In an effort to make life easier for all of us, I am going to try to simplify the pattern lists for everyone. I have found many patterns along the way that I did not have a link to, so this exercise has definitely been worthwhile.

Please find a list of patterns related to Angels and Crosses. Each of these patterns would be the perfect embellishment for a card, scrapbook page, or framed art. Contact me if you have questions:


  • Flower Power Girl - She is a very happy "girl" made with a flower. She has great energy for the girl(s) in your life - perfect for a scrapbook page and definitely in a frame.
  • Sunburst Flower - This is a neat flower made using 2 strips of coordinating quilling strips in a spreuer design.
  • Sunburst Flower with Ladybug - One of the great things about quilling is that you can combine your quilled items to make an even more spectacular arrangement. This is an example of combining two elements.
  • Trelis with Yellow and Purple Flowers - Flowers look so elegant climbing up a trelis, here is a pattern to get your thought process flowing.
  • Gilded Poinsettia - beautiful gilded poinsettia pattern
  • Poinsettia - a traditional poinsettia with a fringed flower center
  • Autumn Basket - 2 patterns in one. First there is a versatile wicker basket pattern that can be used in many ways, this pattern shows it filled with brightly colored fringed flowers.
  • Daisy Card - this is my favorite Daisy card, the daisy is off-set on a diamond background with the stem artistically arranged such that it barely touches the card.
  • 4 Daisy Designs - 4 variations of the daisy design.
Don't forget to check out the other free pattern links on the left hand side menu.

Enjoy!
Copyright for Personal Use Antonella DeFalco

Technorati Tags: , , , , , , , ,

Thứ Hai, 2 tháng 6, 2008

Free Quilling Pattern Happy Song Birds

quilled song birds
Here is a sweet project using a 2-1/2 x 3-1/2 inch format (ATC size) - I still haven't decided if it will be added to a card or framed? Why not share your thoughts in a comment?

I started with a 2 part crackle medium. This is easy to use:
  • Start with a dark navy blue as the base, let it dry
  • Apply the crackle medium, let it dry
  • Paint a white top coat over the crackle medium and this is where the magic occurs - as the paint drys it creates "cracks" where the blue peaks through

Then I painted some tree branches in blue (I am into blue these days) :-)

This is where the quilling is added....

2 Song Birds (make each one this way - updated paper length):
  • 1 - 12 in ( 30.4 cm) redshaped teardrop - play with this a little to get it to look like the body
  • 1 - 6 in ( 15.2 cm) red teardrop for the head - lay this teardrop with the pointed end on top of the rounded body
  • 1 - 1.5 in (3.8 cm) white beak - roll into a lose coil and push into center to create the beak


The remaining accents all use 1/16 in ( cm) wide paper
  • 10 - 3 in ( 7.6 cm) green shaped marquise
  • 1 - 3 in ( 7.6 cm) green teardrop
  • 3 - 1.5 in ( 3.8 cm) green spiral
  • 4 - 1.5 in ( 3.8 cm) red tight roll - for buds
  • 8 - 1.5 in ( 3.8 cm) white tight roll - for buds

Arrange as shown and you have pair of very Happy Song Birds!

Enjoy!
Copyright for Personal Use Antonella DeFalco

Technorati Tags: , , , , , , , ,

Chủ Nhật, 16 tháng 3, 2008

Free Quilling Pattern Flower Power Girl

free quilling pattern flower girl
I want to give a special Shout Out to my friend Toni - who inspired this pattern and to my friend Marie who always makes me smile ...

This very happy Flower Power Girl is ready to brighten up anyone's day... She is perfect for a card or scrapbook page. This particular beauty was framed and given as a gift.

To Make Her Dress
Bodice - use 1/8 in (.3 cm) wide quilling paper
  • 1 - 8 in (20.32 cm) Purple Marquise
  • 2 - 4 in (10.16 cm) Purple Marquise for her sleeves

Skirt - use 1/8 in (.3 cm) wide quilling paper and 1/4 in (.6 cm) wide for fringed flower
  • 1 - 6 in (15.24 cm) Pink fringed flower
  • 2 - 8 in (20.32 cm) Red Marquise (outside)
  • 2 - 6 in (15.24 cm) Red Marquise
  • 2 - 6 in (15.24 cm) Pink Marquise
  • 1 - 4 in (10.16 cm) Red Marquise (center)
  • Arrange as shown
Tip: Place the large red Marquise on the outside and layer the remaining Marquise alternating color on top to give dimension to the skirt. You can always add more Marquise for a fuller look.

Arms, Legs and Hair
  • 2 - 3 in (7.62 cm) White strips for arms
  • 2 - 6 in (15.24 cm) White strips for legs
  • 2 - 3 in (7.62 cm) Purple Tight Coil for heel
  • 2 - 6 in (15.24 cm) Pink Tight Coil for front of shoes
  • 1 - 48 in (121.92 cm) White Tight Coil for her face
  • 5 - 4 in (10.16 cm) Pink Spiral for her hair

You can mix and match colors to match any card or layout. She was the starting point for a very happy cheerleader for my niece, I altered that design a bit and will have to share that one another day.

I hope you have as much fun as she is!

Enjoy!
Copyright for Personal Use Antonella DeFalco

Technorati Tags: , , , , , , , ,

Thứ Bảy, 23 tháng 2, 2008

Free Quilling Instructions Double Scroll


Scrolls, scrolls, and more scrolls.... I really love scrolls!

They add a delicate touch to any design that you may have. Today I will share with you the Double Scroll.

The instructions are simple. To make the double scroll:

  • Take a strip of quilling paper
  • Fold it nearly in half, leave about 1/8 in (.3 cm) between the tips of the folded paper.
  • Condition both ends of the strip such that each end is curved in the same direction.
  • Place the quilling paper in the slot at the very top of your slotted tool or at the top of your needle tool or corsage pin.
  • Holding the loose end of the paper in one hand and your tool in the other hand, begin turning the your tool gently pulling the paper.
  • Roll the paper toward the fold starting with the shorter side.
  • They should both the rolled in the same direction on the same side so that you end up with 2 scrolls (one on top of the other).
See the picture for guidance. There are many fun designs you can make with this shape!

Enjoy!
Copyright for Personal Use Antonella DeFalco

Technorati Tags: , , , , , ,

Thứ Tư, 13 tháng 2, 2008

Free Quilling Heart Pattern

This is a very special heart for me. It has been published in the 2008 Accord Quilling-A-Day Calendar.

This pattern is great to use for Valentines Day, Wedding Cards, Anniversaries, any love filled moment or occasion. I have decided to use this pattern as my inspiration piece for the One World, One Heart blogging extravaganza. I say the inspiration, because I will post tomorrow the pattern for the actual giveaway.

I am including this pattern from the calendar here on my blog so that you can easily find it. The bonus is that I will also be sharing some helpful hints that were not included in the calendar.

First, I need to start by saying that there are certain shapes that I absolutely love to use, and the S-scroll shape is definitely one of those shapes. Please click here for the instructions to make the S-scroll shape.

I think you can see by the picture... I think that they make for such a light, elegant look to your quilled design. The only problem I have found with the S-scrolls is because they are so airy, there is not much glue surface area so you have to be careful with these designs. If you can attach your S-scroll to another shape that is always helpful as you now have an additional anchor point in your work.

To make the heart shape do the following (please use the picture for placement):


  • 14 - 3 in (7.62 cm) S-Scrolls – Arrange in heart shape.

  • For a perfect heart shape every time, Draw, cut, or punch out the heart shape and use this shape as your heart pattern.

  • Look closely at the top and bottom of the heart where the 2 sides meet, I found that the nicest look and shape for the heart happen when you connect/glue the S-scrolls such that they are facing eachother and you glue the bottom.

Embellishments for the Heart. I chose to use Heart Coils to add to the "LOVE" theme (the best part is that you can change the shapes and create a completely unique design):

First Heart Embellishment Arrangement:


  • 3- 3 in (7.62 cm) White Heart shaped coils

  • 2 - 1 in (2.54 cm) Green Spirals

  • Note: I have cut the 1/8 inch (.3cm) quilling strip in half, when creating the spirals for a more delicate look. You can also use 1/16 in (.15 cm) wide paper if you have some.

  • I placed the hearts at the top of the heart where it dips in the center.

  • I thought this made it look like the heart was a delicate necklace with the hearts as the pendant.

  • I have to share with you that I don't like the color green I selected. I had new paper that I wanted to use, but I would definitely go with a deeper green than this.
Second Heart Embellishment arrangement:


  • 4- 3 in (7.62 cm) White Heart shaped coils

  • 2 - 1 in (2.54 cm) Green Spirals

  • Note: I have cut the 1/8 inch (.3cm) quilling strip in half, when creating the spirals for a more delicate look. You can also use 1/16 in (.15 cm) wide paper if you have some.

  • These hearts I arranged on the top, right side of the heart for some added interest.

Here is a variation I made and framed to show you how you might modify the original design to create something similar, yet uniquely your own. :-)


Please have fun with this pattern/design. Feel free to share with me what you have created.

Enjoy!
Copyright for Personal Use Antonella DeFalco

Technorati Tags: , , , , , , , ,

Thứ Ba, 6 tháng 11, 2007

Free Quilled Turkey Pattern

quilled turkey pattern
Gobble, Gobble!

With Thanksgiving on the way I thought it would be fun to post a slightly revised Turkey pattern. This is done in the style of "Creative Quilling Traditional and Modern Designs" By Trees Tra and Pieter Van Der Wolk

I used full-length strips, in this case they were 24 inch (60.96 cm) strips. You can use any manufacturer and they don't have to be this long.
For the Turkey's body and curled "feather" tail:
  • 10 - 24 inch (60.96 cm) strips, rolled into a tight coil. Roll all strips together. I took the strips and slightly offset them to make it easier to start the coil.Do not roll all the way to the end of the strips. Leave approximately 6 in (15.24 cm) free.
  • Glue all the strips at this point to keep the body tightly coiled while leaving the ends loose.
  • Take the free ends and create loose open coils, coiling them in different directions as the "feathers" of your turkey.
For the head:
  • 1 - 12 in (30.48 cm) brown teardrop for the head
  • 1 - 6 in (15.24 cm) black triangle for the beak
  • 1 - 6 in (15.34 cm) modified red teardrop, with a dangling spiral. This is made by curling the first half of the strip into a teardrop and glueing it where you pinch it to make the teardrop. Then take the remaining strip and create a spiral. This is for the fleshy carbuncle that hangs from the beak, called a snood.
To make the eye:

  • Take Black, White, and Black strips glued together and roll together to make the eye.
I hope you enjoy this little fella!

Thứ Năm, 12 tháng 7, 2007

Quilling Shape - Grape Roll


The Grape Roll is based on the Tight Coil/Tight Roll/Peg shape.


I will repeat those instructions here briefly, select the link above if you require more information.


  • Take the quilling strip and begin rolling it, keeping the paper tight and a nice even tension.

  • Keep the edges straight so that a belly or tornado effect is not created.

  • Carefully pull the paper off the tool and glue the end. Keeping the tight shape.

  • After the glue has dried, gently push the center of the coil outward.

  • Refer to the picture for reference.

  • Various items can be used to push the center out. A pencil, pen cap, your fingers. The key is to keep the shape as even as possible.
Here is a link to the Free Shape Instructions that I have posted.
Here is a link to the Free Quilling Patterns that I have posted.

Thứ Bảy, 7 tháng 7, 2007

Free Spreuer Patterns


To help you find the Spreuer patterns more easily, I have created this post with links to the patterns.

  • Christmas Angel - This Angel is red and green and has curly hair. She also wears her heart on her sleeve. You can use this basic pattern for so many things including a baby announcement or any religious event.
  • Christmas Cross - A sweet Christmas cross with a flower in the center. This is a traditional cross shape.
  • Easter Cross - This is a Spreuer Cross using the Patriarchal Cross design. It is augmented with delicate roses. Perfect design for Baptism, Weddings, Communions, Confirmations, Sympathy, or any religious gift or event.
  • Spreuer Christmas Tree - A simple tree decorated with christmas lights.
  • Spreuer Flower - A yellow and orange subburst spreuer flower.
I hope that you enjoy these patterns. Remember, they are free for personal use!

Enjoy!
Copyright (personal use) Antonella DeFalco

Technorati Tags: , , , , , , , ,

Thứ Bảy, 2 tháng 6, 2007

Free Quilled Flower Girl Dress Pattern


June is the month for weddings so in keeping with that tradition today's pattern is a pretty little girl's dress. Perfect for the flower girl, this pattern is appropriate for your scrapbook page or a card. The possibilities are endless.


To make this cute dress I used white, 1/8 in (.3 cm) wide quilling paper and made the following:

Dress Bodice:
1 - 6 in (15.2 cm) Heart Coil
1 - 4 in (10.2 cm) V-Scroll flattened to give shape to the neckline by following the top of the heart with the scrolls adding sleeves to the dress

Dress - Skirt:
3 - 6 in (15.2 cm) Teardrops
3 - 3 in (7.6 cm) S-scrolls for the bottom of the dress (they add interest and give form to the bottom of the dress)

Arrange the Teardrops so that they touch at the waist-line. I flattened the center teardrop a bit to make the dress keep a more natural curve at the bottom.

The S-Scrolls then run along the bottom of dress.

Bouquet:
1 - Green 1.5 in (3.8 cm) C-scroll
7 - Pink 1 in (2.5 cm) Loose coils
2 - Green 2 in (5.1 cm) Teardrop for leaves

For the Bouquet I used 1/16 in (.15 cm) wide paper for a more delicate look and also to keep the piece from becoming too bulky.

Place the C-Scroll at the top of the bouquet
Place 1 - loose coil in the center of the C-scroll (see picture)
Then add a row of 3 loose coils, 2 loose coils and end with 1 loose coil
Add 2 Green leaves to complete the bouquet


Your dress is now ready for that scrapbook page!

If you do not add the bouquet, you can use the same pattern for a communion or christening dress as well.


Enjoy!
Copyright Antonella DeFalco

Technorati Tags: , , , , , , , ,

Thứ Ba, 24 tháng 4, 2007

Tea Bag Folding - Kite Fold

Teabag folding is a fun craft to do and has a fun history. A woman from Holland had a dilemma, she did not have a birthday card for her sister. The story goes, as she sat down with a cup of tea pondering her dilemma, she started folding her tea bag envelope and this is how the craft of tea bag folding began.

Here are some fun and easy projects, please check them out:


Enjoy!
Copyright Antonella DeFalco

Technorati Tags: , , ,

Thứ Năm, 5 tháng 4, 2007

Gerbera Daisy Quilling Pattern

quilled gerbera daisy

A splash of color in every Gerbera Daisy...

Do you ever like to challenge yourself? Sometimes I think it is a lot of fun, so I limited myself to the following and decided to see what I could come up with:
  • Black card blank
  • Pink and Turquoise quilling strips
  • Pink, green, and yellow squares
  • White rectangle
  • Rhinestones

For each Daisy:
  • 5 - 6 inch (15.24 cm) Teardrops
  • Place all teardrops with the points touching in the center and glue
  • 1 - rhinestone (placed in the center)

The original card that I wanted to make was this simple color blocked design. I have deliberately included 2 versions of this card to show you how a simple scrapbooking/cardmaking ink drawn stitching can make a world of difference on your finished product.

You can see that these cards are the same except for the added "stitching" on the second card. This very easy to do pattern of "dot dash dot dash dot" (. _ . _ . _ . _) really adds a finishing touch to this card. Where as the first card looks ok, you realize when you see the second card that it could be that much better.

I think my favorite thing about this card is the rhinestones. I have come to appreciate rhinestones and that special something that they add to your projects. I challenge you to take some simple products and come up with your own designs.

Stay tuned tomorrow for a whole slew of cards that I made with these same supplies. Here is my favorite card of all the ones I made.

quilled gerbera daisy


Enjoy!
Copyright Antonella DeFalco

Technorati Tags: , , , , , , , ,

Thứ Tư, 4 tháng 4, 2007

Quilled Daisy Pattern

Spring is here and everything is coming up Daisies. Well, it is a bit cold outside where I live, so not much is growing, but I know that soon the weather will become warmer.

I so much love daisies - especially the quilled ones. They are a perfect addition to a card or scrapbook page and you can always arrange them around a photograph. They are perfect for almost anything. My research says that we get the name daisy from the English translation of "daes eage" or "days eye." They symbolize "Innocence and joy," what a great Title for your scrapbook page.

I love the simplicity and all the vibrant colors that a daisy can be... especially with the Gerbera daisies. How much fun to be able to make a rainbow with your daisies?

I have had a lot of fun making daisies. Today I will post the basic daisy and tomorrow I will share with you my experiments with the Gerbera daisy.

Quilled Daisy

To make the basic 7-Petal Daisy you need the following:
7 - 12 inch (30.48 cm) Teardrops
1 - 24 inch (60.96 cm) grape roll
2 - 12 inch (30.48 cm) Teardrops
1 - strip of green for the stem

Note: When making flowers I tend to use an odd-number of petals. This is a common thing to do in design and is ultimately more pleasing.

Enjoy!
Copyright Antonella DeFalco

Technorati Tags: , , , , , , , ,

Thứ Tư, 24 tháng 1, 2007

Palm Tree and Sunshine in Winter


Brrr.... It has gotten colder here, and I was thinking that something that reminded me of warmer days would be nice...

Here is a Palm Tree that you can add to a card or to a scrapbook page. It is very easy to make.

For the Tree Trunk:
4 -
3 in (7.62 cm) C-Scrolls
1 -
2 in (5.08 cm) C-Scroll

Leaves:
1-
12 in (30.48 cm) Alternate side looping palms (refer to photo)

Alternate Side Looping:
Start with Center loops, first loop approximately ½ inch, second loop larger, bring strip to left and loop then to right and loop. Continue left loop, then right loop, and final left loop then right loop. Place a dab of glue at the bottom each time you pass by.

Coconuts:
1
- 2 in (5.08 cm) Tight Roll
1 -
3 in (7.62 cm) Tight Roll

This is a picture of how I incorporated this design on a card. I could have added a similar embellishment to a summer scrapbooking page or if you are feeling a bit mischievous you can add this to a Christmas page with Santa hanging out at the beach for a well deserved vacation.

Happy Quilling!

Enjoy!
Copyright Antonella DeFalco

Technorati Tags: , , , , , , , , ,

Chủ Nhật, 17 tháng 9, 2006

Free Quilling Patterns

I have been adding Free Quilling Patterns to this site so that everyone can see how easy quilling is. These patterns are free for personal use. You can use them in any non-commercial way. You may not represent these patterns as your own nor sell them commercially. If you would like to use these patterns or sell them, please contact me and we can discuss your specific details.

Please click to learn the basics of quilling and to learn to make the quilled shapes.

Beginner Patterns (these patterns use only the basic coil and spiral shapes):


  • 7 Petal Daisy - This is your basic Daisy pattern, quick and easy. A classic quilled design.
  • 4 Daisy Patterns - In this post, I provide photo and instructions for 4 basic daisy patterns.
  • Daisy Pattern - yet another daisy pattern. This one is shown on a card to demonstrate how you can combine quilling with card making.
  • Turkey Pattern - this uses simple techniques, but was something new for me. A bit of an abstract attempt.
  • Christmas Poinsettia - Here is a simple Quilled Christmas Poinsettia project. This is a classic that is perfect to add a string and make an ornament to hang on your tree!

  • These patterns use a variety of techniques and shapes and are fun to try:


    • Hot Air Balloon - Shows you how to use the fill-in technique to create a Hot Air Balloon
    • Wedding Cake - Uses fringed flower and alternate side looping techniques to create some really beautiful flowers that adorn a wedding cake. Suitable for a Wedding Card or as an embellishment on your scrapbook page.
    • Butterfly - This is an intermediate pattern that uses only the basic shapes.
    • Flowers of Love - This pattern uses S-scrolls to make a heart and accents this with white coil hearts. Lots of love for all of your Valentine's and Anniversary needs. This pattern was published in the Accord Quilling Calendar!
    • Lovey Dovey Birdhouse - This is a birdhouse pattern - very bright and springy.
    • Palm Tree and Sunshine - This is a very simple Palm Tree design. Perfect for that summer scrapbook page or a touch of humor for Christmas with Santa hanging out at the beach.
    • New Home Magnet - This is a great idea for a house warming gift.
    • Butterfly and Dogwoods - This is a perfect combination, a Spreuer Butterfly perched on a beautiful picture of a Pink Dogwood. This includes instructions and a link to the actual photograph so you can make the entire project on your own!
    • Easter Cross - This is a Spreuer Cross using the Patriarchal Cross design. It is augmented with delicate roses. Perfect design for Baptism, Weddings, Communions, Confirmations, Sympathy, or any religious gift or event.
    • Wedding Dress - A beautiful pattern of a Wedding Dress that is suitable for a scrapbook page, bridal shower, or wedding card. This pattern was published in the Accord Quilling Calendar!
    • Flower Girl Dress - This is a quick and easy pattern and can be used for a Flower Girl, Communion, Baptism, you name it. Just change the color and you can have any type of little girl event! This pattern was published in the Accord Quilling Calendar!
    • Red, White, and Blue Ladybug - Quick little ladybug for you to try. Remember, part of the fun is to play with the colors and make quilling truly your own. Here is the lady bug on a Sunburst flower too.
    • Pink Flamingo - this sweetie is made with roses and she is ready to fly away.
    • Happy Song Birds - this is a happy couple on a crackle painted background. The birds are perched on a branch enjoying the beautiful day.
    • Trellis with Yellow Flowers - Have you ever wanted to make a trellis and have flowers growing on the trellis, here is a simple pattern for you to try.
    • Flower Power Girl - This is a happy pattern inspired by my friend Toni, she literally leaps off the page.
    3D Quilling Patterns:

    • Spinning Top - This is made completely out of paper, including the spinning stick! Great idea for the kids.
    • Patriotic Spinning Top - Who knew a toothpick could be so useful. For tons of fun, try out this spinning top.

    Some Special Card Patterns:


    More Patterns and Techniques:
    Click here for my special December Days of Quilling series. I have several winter patterns that are fun and easy to make.

    Click here for Spreuer Free Patterns.

    Want to make ATCs (Artist Trading Cards)? Click here for a tutorial.


    Please send me a comment on this post or email me with any specific patterns you would like to see. There is a really good chance that I have the pattern or can make one for you.

    Technorati Tags: , , , , ,

    Copyright for Personal Use Antonella DeFalco


    Chủ Nhật, 25 tháng 6, 2006

    Free Quilling Pattern - Basic Shapes

    free quilling patterns daisy

    Hello Again, since I have had requests to show some more of my work, I decided to combine this with a free pattern... I have many more Free Quilling Patterns, please click on this link.

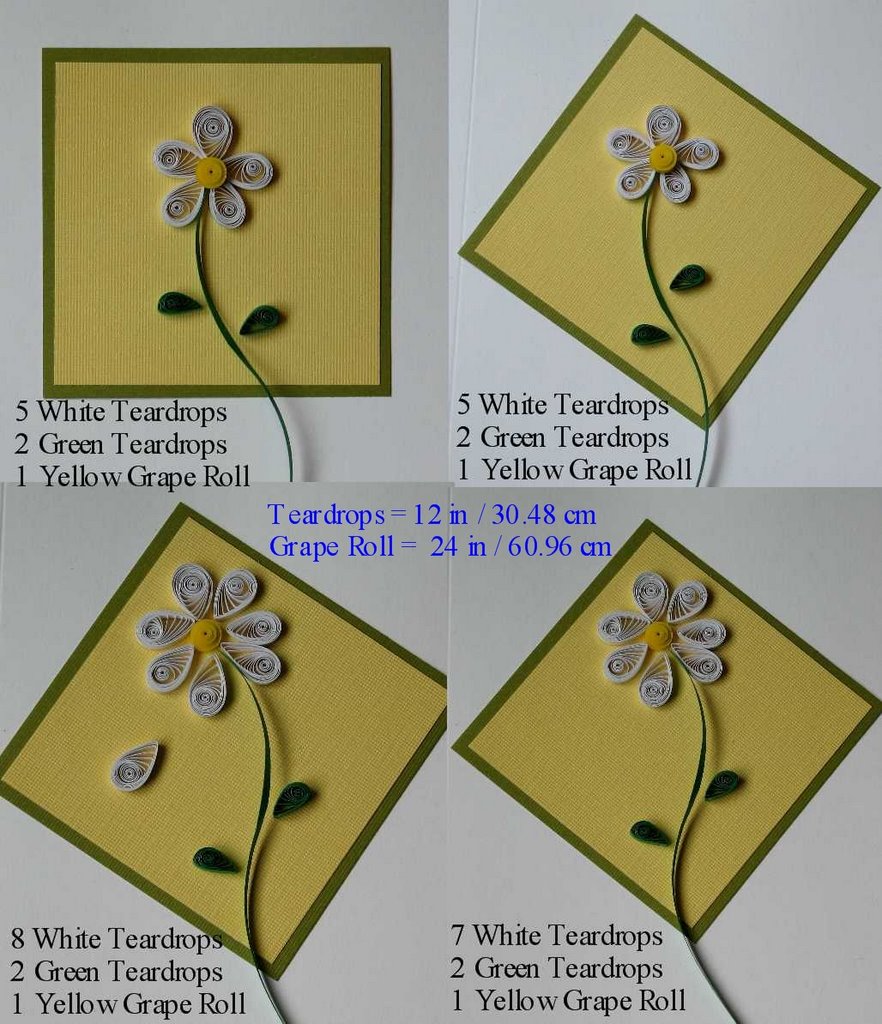
    As you can see from the pictures that I have included, you can create a really pretty flower with only the teardrop and tight coil shape. These are some of my favorite shapes and these flowers are classic designs. You can see in the attached pictures that I have placed them on a double mat - very simple, but elegant (at least I think so). And something that I know you can do!!

    The flowers are your basic Daisy pattern. The first 2 are the same flower - 5 petals each, with the yellow center placed on top of the white teardrops. The difference is in the placement of the double mat behind the flower. The first one is a standard square shape, the second is the square turned into a diamond. There is something about the diamond shape that I really like on a card.

    The bottom 2 flowers are what I call the "He Loves Me, He Loves Me Not Flowers" My reason is simple; the one with the petal that is "falling" down is someone pulling the petals off the daisy to find out about her true love. :-) The flowers themselves have 7 petals each. In addition to having more petals, these bottom 2 flowers have the center coil resting on the mat directly, it is not resting on the teardrop coils. The teardrop coils in this case touch the sides of the center coil.

    free quilling pattern grape rollPlease note, I have cheated a bit and modified the tight coil in the pictures to be what is called a grape roll shape, so I will explain it here for you (see the attached photo for a pictorial view). You start with the tight coil and then you shape it so that the center is "pushed out". This picture shows you how the shape starts out - I have placed the coil on its side so that you can see that the center pushes out when you are done.

    Keep in mind that I used 1/8" (.3cm) paper in my example.

    You can use any color paper that you wish, I selected white and yellow because I was making them to show someone and these were the colors that I needed for this project.

    One last thing, I indicated the length of paper that I used, but I encourage you to experiment with different lengths! Please do try some and show me what you have done. I'm looking forward to hearing from you!

    Copyright Antonella DeFalco
    Labels

    Accessories Adult English afghan afghan stitch AGULHAS Amigurumi amirugumi Ảnh anniversary applique Art artist artist trading card Árvore de Natal em croche atc autumn basket award Ẩm thực baby crochet Baby Dress baby knitting Baby learn back to school bag Bags BAKTUS Ballet Bun Cover balloons BARRADOS Bead Beads Bear Ear Hat BEBÊS belts Berry bird birdhouse birthday card blanket blog candy BLUSAS BOINA BOLEROS BOLSAS books booties BORBOLETAS bouquet bows boxes boy card bracelet breast cancer bridal shower bunny Búp bê butterfly CACHECOL CACHECOLAR cake calendar candles candy Candy Cane capilano suspension bridge card card drive card making Cards cards for kids carving carving fruit carving fruits CASACO INFANTI CASACOS CASAQUINHO EM CROCHE CASAQUINHO EM TRICO CASAQUINHO PARA BEBÊ Cắm hoa Cắt may CHAPEU cheerleader childrens crafts christmas quilling clay COLAR COLAR DE FLORES COLETE coloring copyright CORDÃO corned beef CORUJUINHAS crafts CROCHE COM SAQUINHOS PLASTICOS CROCHE IRLANDES crochet Crochet Geek crochet pattern cross cross stitch Curtain cutting paper daisy DECORAÇAO Detail crochet - Móc chi tiết Dicionário de Trico - Inglês/Portugues Doily Doll Dolls dress Đan len earring easter easter card ECHARPE embellishment Embroidery ENXOVAL PARA BEBÉ ESTOLAS explosion gift card holder FAIXA PARA CABELOS fashion fathers day Felt filigrana Floral crochet - Móc hoa FLORES flower flower arrangement flowers crochet Folding paper FOLHAS food food decor frances shilliday free atc pattern free easter pattern FREE FORM free gift free instructions free pattern free quilling instructions free quilling pattern free rice free spreuer patterns fringed flower frustration fun facts Funny Galaxy Stitch Gang tay - Tất garden Gấp giấy Gấp hộp Gấp khăn - Trang trí món ăn gel grips Giầy - Dép gift gift card holder Gifts giveaway glass gloves Gói quà - gấp nơ golf GOLINHAS Google+ GORRO Gối cho bé graduation card GRÁFICOS Granny Square grape roll Hair hair clip halloween happy birthday hat hats heart Hexagon history holiday craft holiday crafts home and garden Hook Itunes jewelery jewelry Kết hạt Khăn - Mũ kirigami kite fold Knit knitting knitting pattern knot ladybug Làm + Trang trí bánh Làm đẹp Làm đồ chơi làm đồ chơi từ gỗ Làm hoa giấy Làm hoa nhựa Làm hoa vải Làm thiệp LEAVES lions gate bridge Log Cabin Square Love luck of the Irish LUMINÁRIAS LUVAS LUVINHAS PARA BEBÊ Magazine magnolia stamp make it monday make up making flower making flowers Making toys mandala Manta MANTA PARA BEBÊ MANTA PARA SOFÁ Mẫu móc Mẫu đan chi tiết Mẫu móc mẫu móc chi tiết Mẫu móc hoa MEUS MOMENTOS MEUS TRABALHOS Michelle Ewart mittens Móc khăn trải bàn Mothers Day motif Multiples myths Nail art naqg necklace needle tool Nghệ thuật Nghệ thuật cắt giấy Nhà đẹp one world one heart Origami owl owoh Pachwork painting Painting - Vẽ PANTUFAS PAP Paper paper filigree paper quilling paper tag paper weight Patchwork patriotic peg PELERINE photograph Phông nền làm ảnh pictures Pillows pink artist pink artist parade of squares pink dogwood pink flamingo pinwheel plastic POLAINA poncho Popcorn puff stitch pumpkin pumpkin cap QUADRADO quilled angel quilled c-scroll quilled coil heart quilled cross quilled double scroll quilled dress quilled eye shape quilled flower girl dress quilled flowers quilled heart quilled heart scroll quilled loose coil quilled loose scroll quilled marquis shape quilled open coil quilled open heart quilled ornament quilled palm tree quilled raindrop shape quilled s-scroll quilled snowflake quilled snowman quilled spiral shape quilled teardrop shape quilled turkey quilled valentine quilling quilling coil shapes quilling double scroll quilling instructions quilling paper quilling pattern quilling shapes quilling strips quilling supplies quilling tools Quilt RECEITA RECEITA CULINÁRIA RECEITA DE PONTOS recycle recycling RENDA DE PELO DE CABRA repair work ribbon rings rugs SACOLAS SAIAS DE CROCHE SANDÁLIAS EM CROCHÊ SAPATINHOS SAPATINHOS PARA BEBÊ Scarf scarves Scarves - Khăn scrapbooking scroll shapes sewing shawls shoes and sandals Singing skirt slippers slotted tool small kite fold snood Snowflake soap socks spiral rose spreuer spreuer flower spring SQUARE st patricks day Strawberry SUÉTER summer tag sweater Swiffer Sweeper Cover TABELAS DE MEDIDAS DE TRICO E CROCHE tablecloths tagged TAPETES. RECEITA tarjetas tea bag folding tea bag folding history teabag folding teabag folding history TENIS PARA BEBÊ Tết dây Thank you thanks thanksgiving quilling Thêu Tỉa hoa quả tight coil tight roll tip tips TOALHAS Tóc đẹp TOUCAS TOUCAS PARA BEBÊ Trang điểm Trang trí TRICO Túi xinh TÚNICA tunisian turkey Tutorial Tutorial video underwear Valentine's day valentines crafts valentines heart vancouver Video VÍDEO Video cắt may Video dạy móc video tutorial weaving wedding wedding dress winners winter quilling wood wreath XALE xerox lets say thanks YouTube