Hiển thị các bài đăng có nhãn home and garden. Hiển thị tất cả bài đăng

Thứ Ba, 27 tháng 9, 2011

Crafts for home decor: How to Make a Ceiling Fan – Fun!

Striped Ceiling Fan  
Crafts for home decor: How to Make a Ceiling Fan – Fun!
This fan is in my oldest daughter, Kelly’s room.  Her room is nothing but a museum right now, a testament to who she was and aspired to be.  She is 22, graduated from college and not living at home anymore.  I went into the room the other day and happened to look up.  I smiled as I remember painting the fan with stripes when we first moved in.    This was a project that was included in my book, Instant Decorating.

Painting a ceiling fan is one easy way to add color to where it is most often neglected – on the ceiling.  Ceiling fans are wonderful to help the air circulate, but can be eyesores when they don’t fit into the decorating scheme.  When we moved into a previous home and my daughters were little, there was a dark-brown ceiling fan with antique brass fittings in each room.   We couldn’t afford to replace them at the time, so to make them look less obvious, I painted each white to blend in with the ceiling.  When I was decorating their room with a color theme, I continued the palette by painting each blade in a different color of decorative stripes.  When we moved into our current house, my oldest, Kelly wanted her new out of the box white fan, painted with the stripes again.  I happily obliged.
Fun Kids Room Ceiling Fan
Kelly liked lots of color in her room as you can see from the neon green walls with the the colorful border of equestrian event ribbons she won.
Kids Room DIY Decorating Ideas

Gather

Ceiling fan with white blades
Pencil
Roll of 1-inch-wide masking tape
5 colors of 2-ounce bottles acrylic paints , one color for each blade
1-inch foam paint brush
Water-based sealer
1. Remove fan blades from fan and clean thoroughly.
2.  Starting from metal ornamental edge, use a pencil to make marks at 1-inch intervals along both edges of the blade.  Repeat on all blades.
3.  Place first piece of tape between first and second marks and around sides of blade.  Then place tape at every other mark.  The tip should have masking tape over it.  Repeat on all blades.
4.  Paint fan blade with two to three thin coats of acrylic paint in unmasked areas, remembering to paint sides of the blades.  Let dry between coats.  Repeat with a different color on each blade. Let dry.
5.  Remove tape.  Brush one to two coats of water-based sealer on entire surface and side edges of blades.  Let dry.  Put blades back on fan.
Kids Room DIY Decorating Ideas

Crafts for home decor: Yarn Lamp Makeover

Mimi’s Lamp Makeover!
 Crafts for home decor: Yarn Lamp Makeover
 
Started with this:
The lamp base, the lamp shade, some yarn, an embellishment strip and spray paint…
and as you can see I love the colors.


After the paint dried I started to SPRAY glue the yarn horizontally all around the lamp shade. I sprayed as I went, little by little, section by section.
This step took me somewhere between 20 and 30 minutes…
If you do this project DON’T PANIC if you see glue all over the shade…
by the time you are done it will be all covered…
Cute, huh?
{Third}
I added the  pom-pom strip… You can find it at any fabric store.
I got mine at Wal-Mart with the yarn.
{ I love that the yarn has the three colors}
OK, back to the Tutorial…
So, all I did was to spray the glue carefully around the bottom edge of the shade to glue it…
{ Fourth }
It was time to sit back and enjoy the view…
So here it is


Chủ Nhật, 25 tháng 9, 2011

Embroidered pictures for home decor: spring button flowers tutoriral

LA7_0865b

Embroidered pictures for home decor: spring button flowers tutoriral

DSC_0016b


Today we are turning buttons into flowers and making a cute handmade display-piece! Enjoy :)
You will Need:
  • Buttons that feel "Flowery"
  • Neutral Fabric (mine was a fine linen colored cotton)
  • Embroidery Thread (I used a few greens for the stems & yellow for the flower centers)
  • Small Needle
  • Scissors
  • Pencil or Invisible Marker
  • An embroidery hoop to be used as a frame
Freckled_Nest_Diy
Step 1: Space out your buttons on the fabric and mark a little pencil dot where you want each one. Like the example above, make sure to leave room for the stem below each button.
Step 2: Sew on the buttons all at once with one color of thread. Visit this post for tips on how to start and end your stitching.
LA7_0865b
Step 3: Stitch a straight dashed line below each button, starting just under the button and ending at an 'invisible horizontal line'.
LA7_0904b
Step 4: Frame your fabric in an ornamental embroidery hoop, hide or trim the fabric overhang in behind (I taped mine on the back).
Step 5: Hang your new artwork :)
LA7_0988b
I hung mine above my desk at the Studio :) This project would be fun as a button swap with friends (you could even do it on a teatowel)! Try it :)
Interested in another Button Craft? Check out this Cork Frame Project :)
2

Thứ Sáu, 23 tháng 9, 2011

Art and easy crafts for kids: Crayon Art & Crepe Paper Flowers - a tutorial

If you're on Pinterest, there's a really good chance you've seen these melted crayon works of art.

Art and easy crafts for kids: Crayon Art & Crepe Paper Flowers - a tutorial
The boys and I made our pictures before I bought the frames.  I would suggest buying the frames first, so you know just how far the crayons need to be from the edges to fit in the frames.  I had to do some serious sanding on my frame, and the boys could have added another crayon to their pictures.

We were so excited to try this, that I forgot to take pictures (again!), but it's really easy.
What you'll need:
Canvas
Crayons (enough to cover 1 edge of your canvas)
Elmer's Glue
Blow Dryer and/or Space Heater
Wax Paper or newspaper
Small jar

1.  Put your canvas in your frame.  Use painter's tape to mark the edges of the frame on your canvas. 

2.  Take the canvas out of the frame & using more painter's tape, meet the edges of Step 1's tape.


3.  Remove the tape from Step 1.  You now know where you can put your crayons.

4.  Pick out your crayons.  We used 21 crayons for ours.  It was the perfect number for my frame, but we probably could have squeezed in a 22nd crayon for the boys.

5. On your work surface, line up your crayons the way you want them on your canvas.  Then, start applying the glue to your canvas, and add your crayons.

6.  Introduce your kids to some of your favorite big band songs, and dance around with them while waiting for the glue to dry.  It doesn't take long, about 10-15 minutes.

7.  Lay down some newspaper (we used a hand towel with some waxed paper on top), and prop the crayon side of your canvas up on your short jar.  With your space heater and/or blow dryer (make sure you have it on your lowest setting so it doesn't splatter the wax), start melting your crayons.

8.  Once the crayons start melting, you'll want to stand the canvas up more.  We did ours on the floor, so we just propped them up against the wall.

From left to right: Mine (when I did mine, I just had my canvas propped up on the jar, which gave me fatter drips), Awesome's (he picked his colors by how he wanted to see them mix, then wanted it hung horizontally to look like a machine gun!), and Bug's.

Now for the Crepe Paper Flowers

What you need:
Crepe Paper/Streamers
Glue
Scissors


Oops!  No Picture!
Stick your flower onto the glued area, then cut away the excess.


Thứ Hai, 19 tháng 9, 2011

Buttons arts: Amazing Button Crafts from Around the Web


A sheep that's cute as a button!  Hmm.  What pertinent information can I tell you about this sheep?  The buttons are sewn onto this lucious green fabric, as are the felt head (and ear).  The legs and outline are basic embroidery.  The frame measures 6 1/2 inches square.  You can hang it on a wall, or it also has tabletop-sitting capabilities...I spared no expense when selecting this frame for my loyal followers. 
Okay, here's how to enter:

1.  Leave one comment on this post.

2.  I'll close the giveaway at 6:30am (PST) on Wednesday, September 22nd..

3.  I'll use a random number generator to determine the winner.

4. I will notify the winner via email, so make sure that's available to me either through your blog or your Blogger profile or leave it in your comment.

5. I will ship internationally, so everyone's welcome to participate.

Chủ Nhật, 18 tháng 9, 2011

Crafts for home decor: Lamp Revamp tutoriral


Lamp Revamp

What can I say......this lamp is UGLY!!! Does it not scream thrift store 70's special! I am sure you have all seen something like this at your grandmas back in the day.  But for $5 I thought I would take it home...hey it worked and we all know a little spray paint can go along way!
But that shade had to go it not only had the look, but the smell of the 70's!....... I was not going to be putting that on my bedside table!


I found this new shade for $1 it was a nice shade but just not the look I was going for.

After washing and sanding down the base, I sprayed it with Krylon in brushed metal.  I ripped a part the shade and added some ivory polyester fabric.  I cut out leaf shapes and frayed the edges then I started attaching them to the shade to look like flowers, I like how it gives it some texture.  It's a little hard to see the detail in this picture ....again my photography stills are lacking.


You can see the detail a little better when it's all lit up.  I didn't expect it to look like this when turned on, but its kind of neat.  It's a little small for the scale of my large bed, it will be going in the guest room.  But not bad for $6 (I had the fabric and paint).

Crafts for home decor: Paint Projects – stenciling tutorial

Here’s a quick tutorial for adding a stenciled design to a hutch. You can search for a similar piece, or use this project as a springboard for your own ideas for a piece you already have.
For this project, you’ll need semigloss paints, stencils, stencil adhesive, a stencil brush, and paper towels. Creative positioning of stencils is what makes this design one-of-a-kind. Notice how the cherry blossoms seem to grow right up the back of the hutch and over the doors.
1. Base-coat the hutch with semigloss paint and let it dry.
2. Spray a thin coat of stencil adhesive on the back of the stencil, as shown here, and position the stencil on the hutch.

 
3. Lightly dip a stencil brush into paint, dab off the excess on a paper towel, and brush in the open areas of the stencil using a pouncing motion. Work from the inside of the stencil toward the outside, making sure the stencil is stuck down tightly so the paint won’t bleed under. It’s best to apply the paint in two or three thin layers rather than one thicker one, but there’s no need to allow the paint to dry completely between coats.
 
4. Carefully remove the stencil and reposition it, or choose another of the stencils in the set, and continue stenciling until you have a grouping of motifs that you like. Remember, you can use a stencil upside down, backward, or any way that suits your design.

Thứ Tư, 14 tháng 9, 2011

Schattengewachs - house plants out of the light


Schattengewachs – домашние растения из света 

Schattengewachs - house plants out of the light

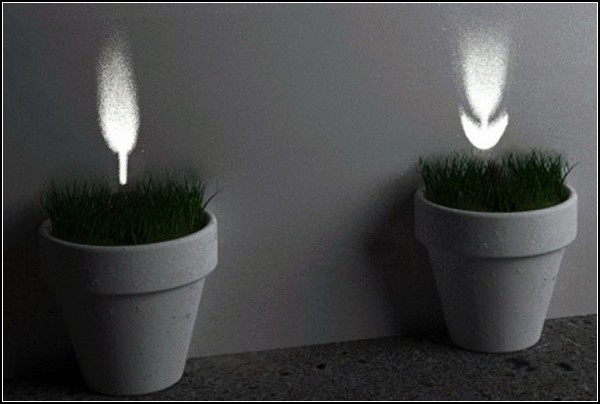
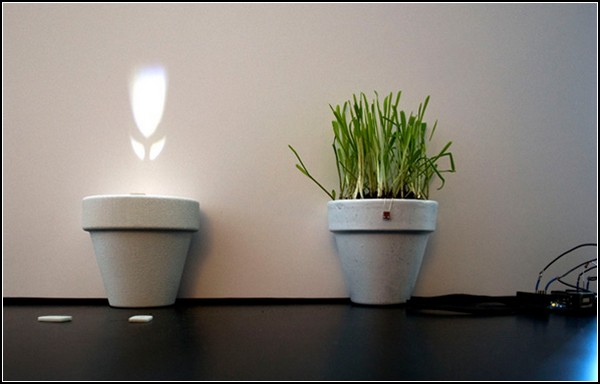
Many people want to have a home any plants. But not all have enough of this spirit, because for them will have to take care of. Yes, even just to water their flowers do not all have time, to say nothing about caring for this "green wall"! But the designer Winkel Maximilian (Maximilian Winkel) created a series of plants for the home called Schattengewachs, for which no need uhazhivat.Eti plants - from light.

Schattengewachs – домашние растения из света 
Schattengewachs - house plants out of the light

From a school course of natural history we know that many plants need light to grow and they were green. But houseplants Schattengewachs, created by designer Maximilian Winkel, need no light, but rather darkness. 
And it is not that this is the night flowers. This is, in principle, no flowers. After Schattengewachs are light installations as diverse flora. 
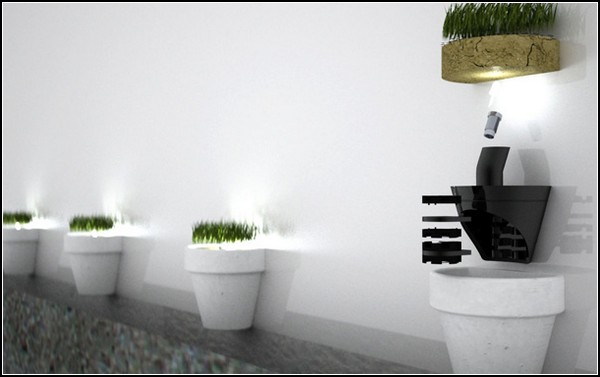
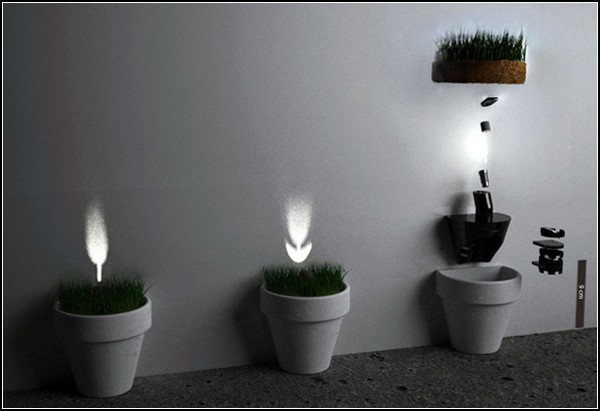
Moreover, they are all set in pots. These pots can even decorate with green grass (grass seed and the earth come with them included). But their main effect is achieved with light. 
Schattengewachs – домашние растения из света 
Schattengewachs - house plants out of the light

True, pots Schattengewachs need to install along the wall. And, when it begins to darken, become apparent that the vertical plane are displayed flowers, shrubs and even trees. Moreover, these plants are programmed to ensure that over time increasing in size, grow. 
Of course, Schattengewachs of Maximilian Winkel - this is not the most beautiful houseplants. But certainly - the most original and trendy. Light installations because of our time in high esteem. 
Schattengewachs – домашние растения из света 
Schattengewachs - house plants out of the light

It now remains to have another baby and pets: dogs, cats, hamsters, rabbits, made ​​of light. However, the latter, that is, sunbeams, already long been there.

Thứ Năm, 8 tháng 9, 2011

Beaurtiful pictures for your home: Exact-o Art tutorial

  
Art can be so expencive, so I decided to make my own. I love google images. I did a search for wrought iron wall art and  found one I liked. I also did a search on owls and came across a picture I fell in love with. I printed the designs out and taped the edges to a black 12x12 scrapbook paper and cut out the negative space using an exacto knife.

Once I finished cutting out I removed the template and trimmed the edges and mounted it on a white paper.
  
For the tree, I cut out the positive space on white paper, mounting it on black.
The frames are 12x12 and I got them half off at Hobby Lobby.


Source: showtellshare.blogspot.com

Labels

Accessories Adult English afghan afghan stitch AGULHAS Amigurumi amirugumi Ảnh anniversary applique Art artist artist trading card Árvore de Natal em croche atc autumn basket award Ẩm thực baby crochet Baby Dress baby knitting Baby learn back to school bag Bags BAKTUS Ballet Bun Cover balloons BARRADOS Bead Beads Bear Ear Hat BEBÊS belts Berry bird birdhouse birthday card blanket blog candy BLUSAS BOINA BOLEROS BOLSAS books booties BORBOLETAS bouquet bows boxes boy card bracelet breast cancer bridal shower bunny Búp bê butterfly CACHECOL CACHECOLAR cake calendar candles candy Candy Cane capilano suspension bridge card card drive card making Cards cards for kids carving carving fruit carving fruits CASACO INFANTI CASACOS CASAQUINHO EM CROCHE CASAQUINHO EM TRICO CASAQUINHO PARA BEBÊ Cắm hoa Cắt may CHAPEU cheerleader childrens crafts christmas quilling clay COLAR COLAR DE FLORES COLETE coloring copyright CORDÃO corned beef CORUJUINHAS crafts CROCHE COM SAQUINHOS PLASTICOS CROCHE IRLANDES crochet Crochet Geek crochet pattern cross cross stitch Curtain cutting paper daisy DECORAÇAO Detail crochet - Móc chi tiết Dicionário de Trico - Inglês/Portugues Doily Doll Dolls dress Đan len earring easter easter card ECHARPE embellishment Embroidery ENXOVAL PARA BEBÉ ESTOLAS explosion gift card holder FAIXA PARA CABELOS fashion fathers day Felt filigrana Floral crochet - Móc hoa FLORES flower flower arrangement flowers crochet Folding paper FOLHAS food food decor frances shilliday free atc pattern free easter pattern FREE FORM free gift free instructions free pattern free quilling instructions free quilling pattern free rice free spreuer patterns fringed flower frustration fun facts Funny Galaxy Stitch Gang tay - Tất garden Gấp giấy Gấp hộp Gấp khăn - Trang trí món ăn gel grips Giầy - Dép gift gift card holder Gifts giveaway glass gloves Gói quà - gấp nơ golf GOLINHAS Google+ GORRO Gối cho bé graduation card GRÁFICOS Granny Square grape roll Hair hair clip halloween happy birthday hat hats heart Hexagon history holiday craft holiday crafts home and garden Hook Itunes jewelery jewelry Kết hạt Khăn - Mũ kirigami kite fold Knit knitting knitting pattern knot ladybug Làm + Trang trí bánh Làm đẹp Làm đồ chơi làm đồ chơi từ gỗ Làm hoa giấy Làm hoa nhựa Làm hoa vải Làm thiệp LEAVES lions gate bridge Log Cabin Square Love luck of the Irish LUMINÁRIAS LUVAS LUVINHAS PARA BEBÊ Magazine magnolia stamp make it monday make up making flower making flowers Making toys mandala Manta MANTA PARA BEBÊ MANTA PARA SOFÁ Mẫu móc Mẫu đan chi tiết Mẫu móc mẫu móc chi tiết Mẫu móc hoa MEUS MOMENTOS MEUS TRABALHOS Michelle Ewart mittens Móc khăn trải bàn Mothers Day motif Multiples myths Nail art naqg necklace needle tool Nghệ thuật Nghệ thuật cắt giấy Nhà đẹp one world one heart Origami owl owoh Pachwork painting Painting - Vẽ PANTUFAS PAP Paper paper filigree paper quilling paper tag paper weight Patchwork patriotic peg PELERINE photograph Phông nền làm ảnh pictures Pillows pink artist pink artist parade of squares pink dogwood pink flamingo pinwheel plastic POLAINA poncho Popcorn puff stitch pumpkin pumpkin cap QUADRADO quilled angel quilled c-scroll quilled coil heart quilled cross quilled double scroll quilled dress quilled eye shape quilled flower girl dress quilled flowers quilled heart quilled heart scroll quilled loose coil quilled loose scroll quilled marquis shape quilled open coil quilled open heart quilled ornament quilled palm tree quilled raindrop shape quilled s-scroll quilled snowflake quilled snowman quilled spiral shape quilled teardrop shape quilled turkey quilled valentine quilling quilling coil shapes quilling double scroll quilling instructions quilling paper quilling pattern quilling shapes quilling strips quilling supplies quilling tools Quilt RECEITA RECEITA CULINÁRIA RECEITA DE PONTOS recycle recycling RENDA DE PELO DE CABRA repair work ribbon rings rugs SACOLAS SAIAS DE CROCHE SANDÁLIAS EM CROCHÊ SAPATINHOS SAPATINHOS PARA BEBÊ Scarf scarves Scarves - Khăn scrapbooking scroll shapes sewing shawls shoes and sandals Singing skirt slippers slotted tool small kite fold snood Snowflake soap socks spiral rose spreuer spreuer flower spring SQUARE st patricks day Strawberry SUÉTER summer tag sweater Swiffer Sweeper Cover TABELAS DE MEDIDAS DE TRICO E CROCHE tablecloths tagged TAPETES. RECEITA tarjetas tea bag folding tea bag folding history teabag folding teabag folding history TENIS PARA BEBÊ Tết dây Thank you thanks thanksgiving quilling Thêu Tỉa hoa quả tight coil tight roll tip tips TOALHAS Tóc đẹp TOUCAS TOUCAS PARA BEBÊ Trang điểm Trang trí TRICO Túi xinh TÚNICA tunisian turkey Tutorial Tutorial video underwear Valentine's day valentines crafts valentines heart vancouver Video VÍDEO Video cắt may Video dạy móc video tutorial weaving wedding wedding dress winners winter quilling wood wreath XALE xerox lets say thanks YouTube