Thứ Tư, 30 tháng 6, 2010

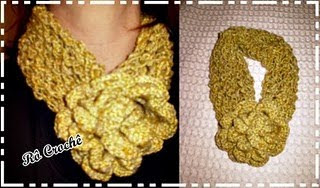
CACHECOLAR usado por Fatima Bernardes

Gola usada por Fatima Bernardes durante a transmissão da Copa.


1 novelo de lã Cisne Elegance;
Agulha para tricô nº 5 ½;
Agulha para coche nº 3.

Colocar 30 pontos com 1 fio de Cisne Elegance na agulha para tricô nº5 ½ e fazer 40cm do ponto abaixo:
- *1tr, 1laç, 2jtr*
Avesso e direito iguais. Arrematar.

Dobrar o trabalho ao meio no sentido do comprimento, unir as pontas dando só alguns pontos para fechar o trabalho.
A seguir com a agulha de crochê fazer 1 flor em cada lado do trabalho.

Fazer 6 correntinhas, prender com 1 ponto baixo, repetir num total de 8 vezes, ficando em toda volta do trabalho com 8 argolas.
Na volta fazer dentro de cada argola 1 ponto baixo, 1 correntinha, 8 pontos alto, 1 correntinha, 1 ponto baixo, formando assim as pétalas.

A seguir, fazer pela parte de trás novamente 6 correntinhas, prendendo com 1 ponto baixo, repetindo 8 vezes e fazer novamente as pétalas. A flor ficará com 2 camadas de pétalas.
Em um lado costurar a flor, juntando as partes bem no meio para ficar uma flor aberta.
Do outro lado, passar um alinhavo só para fechar um pouco a flor.
Depois colocar em volta do pescoço e encaixar a flor fechada dentro da flor aberta.


E esse foi executado pela Roseli Moraes
Aqui o vídeo da Fatima mostrando os cachecóis

Este branco foi executado pela Katia da Magia do Croche

UMA LINDA BOLSA

XALE EM MOHAIR AZUL DEGRADEE


XALE EM REDE E FLORES DE CROCHE


XALE EM CROCHE PONTO PIPOCA


Boy Birthday Card Pinwheel Tutorial

Here we go again, another pinwheel card for a Birthday Boy!

This card is all about the paper.  I cut a Top Fold card out of a dark blue paper:
  • Cut a 4-1/2 x 12 in strip, and fold in half
  • Final card size is 4-1/2 x 6
I then used various scrap pieces of paper, inked the edges and layered them onto the card for texture on the card.  All the papers contained some blue or green to coordinate.  For added interest, I stamped an image on some of the papers.

The pinwheel on this card is smaller than the one I made in the previous card.  I inked one side of the paper because I didn't want to leave it white.  The pinwheel instructions:
  • 1 - 2 inch square
  • Cut in toward the center, but do not cut all the way through (see picture below)
  • This creates 4 triangle shapes
  • I used 1/16 inch punch, and punched one corner of each triangle and the center of the pinwheel
  • Pull the punched corner from each triangle in toward the center
  • I attached a brad and as I pulled each side in I pushed the brad through the punch
  • After all 4 were attached to the brad, I ran the brad through the center of the pinwheel to keep the wheels in place :-)
Banners and/or Flags - I created 5 of these:
  • They are approximately 1 inch long, they were cut free hand
  • I used my 1/16 inch punch to punch in the top 2 corners and then took thread from my sewing kit to connect them.
  • I cheated a bit and added a touch of tape to the back to hold the thread and banners in place.
  • I liked the effect, because the banners gave the card some movement which is always fun (hmmm, that reminds me of those slider cards I used to make... that will have to be another day)
  • I attached the banners and then used pop dots to layer the papers holding the pinwheel above.
For the inside of this card, I used one the double sided papers.

This was relatively quick and easy to put together.

Enjoy!
Copyright for Personal Use Antonella DeFalco

Thứ Ba, 29 tháng 6, 2010

CACHECOL TRICO BRANCO


Este fiz pra minha outra sobrinha, a bela Andreza.

CACHECOL EM TRICOT PRETO E BRANCO


Este tb dei de presente à Vera no aniversário dela do ano passado.

BAKTUS EM TRICO


Esse lenço Baktus fiz em trico com pingente em rabo de gato. Foi um presente pra minha cunhada Vera.

CACHECOL SQUARES LETICIA


Fiz pra minha linda sobrinha Leticia, que hoje está dando um grande passo em sua carreira profissional.
Parabéns amada, vc merece o melhor!
Boa Viagem! Sucesso!

FOLHA DE OUTONO COM GRÁFICO

Mais um modelo da folha de outono que achei na Net

Thứ Hai, 28 tháng 6, 2010

Graduation Owl Card


Isn't this a really fun card? I had so much fun making it, and can honestly say that I am super proud of what I have created!  The owl is partly inspiration from the wonderful selection of cards out there and a large part from my own imagination and ingenuity.

We are going to a graduation party and I wanted to create something special.  When my husband likes a card that I have made, then I know I have created a good one, and he liked this one (usually what I make is "too girly" for him).  As many things do these days, I began my quest for inspiration and ideas by doing a google search on graduation owl cards... I absolutely love google, don't you :-)

As is the case many times when doing a search, I got completely lost in the search.  Yes, I sometimes strayed from the quest, but eventually I had to call the search quits.  I found so many cards that I liked, but the one that was my inspiration is this card by Sharon Caudle from Gramma's House of Cards, check out Sharon's blog, because she is very talented. 


I know what you are thinking, it is an owl, how different can they all be and how did this inspire the owl I created? Yes, most owls do look the same.  They all have a basically rounded face and short round body.  Some are punched or die cut and many others were stamped.  All this is true.  So what was it that inspired me? I really liked the way the die that she used allowed her to layer her owl.  If you look at the accent paper that she used for the belly and face area it really stands out.

Now, as you may have guessed by the differences with our cards, I don't have an owl punch or die cut... did that let stop me? Of course not, just I had to shake out my brain and get a bit creative. So armed with nothing more than my circle punches and scissors,  I got started.  Oh, and don't forget rummaging through the stash of papers that I have too.  I am convinced that the paper stash is secretly happy when I go rummaging through them because they are tired of sitting around looking pretty and not being used - lol.

If you are interested in the instructions for making this fella, click here for the complete set of instructions.  Due to the number of pictures that I used and the somewhat complex set of instructions I felt it was easier to post them there than here.

I hope you enjoy this card and have a wonderful day!


Enjoy!
Copyright for Personal Use Antonella DeFalco

Thứ Sáu, 25 tháng 6, 2010

Estou voltando

Estive ausente e agradeço as mensagens carinhosas que recebi neste tempo, e peço paciência mas irei responder a todas (os) vocês.

Thứ Tư, 23 tháng 6, 2010

Birthday Card for a Boy

Hello my friends... I don't know about you, but I struggle when it comes time to make Birthday Cards.  I can't even explain why? Perhaps it is the pressure of creating something that a child will like :-)  or just the initial inertia of trying to come up with a card idea or design.  Of course, when it comes to children, I am probably giving it too much thought because the card probably wasn't even glanced at and has been forgotten in the midst of opening the gifts - lol.

I think "boy" cards frighten me even more than "girl" cards - I mean with girl cards you can at least fall back on pinks and flowers or glitter, but boys?? Even looking around online it is hard to find ideas that can be incorporated.

Well, we recently attended 2 Birthday parties for my son's friends, and you guessed it, they are both boys.  So I decided to surf the internet looking for inspiration... I passed up many of the designs, although very cute, were a bit too young.  I finally came across one of those pinwheels, you remember the ones we used to make when we were little (well, you do have to be a bit older to remember them - lol)...  And I decided that this would be my inspiration and came up with 2 similar cards based on a pinwheel theme.

Here is one of the cards I made (I promise to post the other one soon because I got a bit more bold with my palette and paper stash)

The card is 4 x 6 oriented with the opening at the top, on the short side.  I used a nice double-sided paper from ancestry.com K and Company paper pad to make the card base.  As you can see, I chose a palette of greens and blues (always appropriate for a boy).

For the pinwheel, I used 2 scrap pieces (Note: Next time I would definitely use a double-sided paper for the pinwheel):

  • 2 - 3 inch squares
  • I took the squares and cut in from each corner toward the center
  • I mark my center with a little dot
  • Do not cut all the way to the center, leave about 1/8 inch in from each corner (I added a little picture of a square with the center marked to show that you do not want to cut all the way through)
  • This will create 4 "triangles"
  • You then pull one corner from each of these triangles in toward the center and adhere it - you can look at the finished pinwheel to see this
  • For this card, I used a glue dot and glued each end to the glue dot 
  • I then used a K and Company birthday hat embellishment and added it to the center
  • Note: on the other card I made, I used a brad to secure it
I then simply adhered to pinwheel to the card


For the sentiment, I printed and matted a nice "Happy Birthday" in Microsoft Word

Now, the only thing left to do was make sure that the inside of the card also looked nice.  So I matted a blank yellow cardstock and added a little header with a strip of paper left over from my pinwheel.

I really liked the way this card looked when I made it, and so did my son :-)

The next card will have a few more elements to make it a bit more interesting to look at.


Enjoy! Copyright for Personal Use Antonella DeFalco

Chủ Nhật, 20 tháng 6, 2010

Happy Father's Day

Hello and Happy Father's Day!

Wow, it has been a long time since I last posted! Today I wanted to share with you the fun little project that I have been working on for my dear hubby.

I have gone back to basics and made a project that involves paper, photos, and lots of shabby chic techniques.

I started by creating an accordion folded album, found some fun father themed quotes and printed them onto some nice scrapbook paper.  I have tons of scrapbook paper and I really need to do more of these projects because this paper is crying out to be used.

I decided to use photos that I converted to black and white because I love the way they pop off the page against the colorful paper.  I also have to thank Becca, from Amazing Paper Grace, for inspiring me to finally use some of that ribbon that I have on a project.

I am very proud of this little project and had lots of fun making it... I also created a similar one for my Dad in shades of brown... that is the best part about using the computer :-) 


I don't have time right now, but I will convert the quotes into a PDF document if you are interested.  I will update this post when it is ready and provide a link to the full set of instructions, including the quotes should you want to use them on one of your projects.


Enjoy!
Copyright for Personal Use Antonella DeFalco
Thứ Tư, 16 tháng 6, 2010

Magic Crochet Potholder with the Single Crochet


Magic Crochet Potholder with the Single Crochet

Written by Teresa Richardson

Video Tutorial:  Magic Crochet Potholder with the Single Crochet

Video Tutorial: Left Hand Magic Crochet Potholder with the Single Crochet

Skill Level - Easy

Abbreviations
CH - Chain
SL ST - Slip Stitch

FSC - Foundation Single Crochet
SC - Single Crochet

Materials
Size H/5 mm crochet hook
4 ply cotton yarn
Tapestry Needle

Chain 31 or work 30 FSC- Foundation Single Crochet


Round 1 -Side 1: Work 1 SC in each chain across.  (30 Single Crochet Total on the first side)
Round 1 - Side 2: Working down the opposite side of the chain, Single Crochet in each chain. Slip stitch to join with the beginning stitch. (30 Single Crochet Total on side 2)  (There will be a total of 60 single crochet, both sides)

Note:  You can work this project with joined rounds or with the continual round.  To work the continual round, you will not join.  Work the first single crochet in the top of the first single crochet, continue around.  You may want to mark the first stitch with a yarn marker so you know where the first stitch is at.


Round 2-20: Work 1 SC in each stitch around.  Join with the first stitch if you are working joined rounds.  


If you have worked the continual round, skip one stitch, slip stitch in the next to even off the round.


Cut a long tail and secure.  Fold the potholder in to a square.  Click here to See Video Segment.  Sew the two edges together. Sew in the tail.

Labels

Accessories Adult English afghan afghan stitch AGULHAS Amigurumi amirugumi Ảnh anniversary applique Art artist artist trading card Árvore de Natal em croche atc autumn basket award Ẩm thực baby crochet Baby Dress baby knitting Baby learn back to school bag Bags BAKTUS Ballet Bun Cover balloons BARRADOS Bead Beads Bear Ear Hat BEBÊS belts Berry bird birdhouse birthday card blanket blog candy BLUSAS BOINA BOLEROS BOLSAS books booties BORBOLETAS bouquet bows boxes boy card bracelet breast cancer bridal shower bunny Búp bê butterfly CACHECOL CACHECOLAR cake calendar candles candy Candy Cane capilano suspension bridge card card drive card making Cards cards for kids carving carving fruit carving fruits CASACO INFANTI CASACOS CASAQUINHO EM CROCHE CASAQUINHO EM TRICO CASAQUINHO PARA BEBÊ Cắm hoa Cắt may CHAPEU cheerleader childrens crafts christmas quilling clay COLAR COLAR DE FLORES COLETE coloring copyright CORDÃO corned beef CORUJUINHAS crafts CROCHE COM SAQUINHOS PLASTICOS CROCHE IRLANDES crochet Crochet Geek crochet pattern cross cross stitch Curtain cutting paper daisy DECORAÇAO Detail crochet - Móc chi tiết Dicionário de Trico - Inglês/Portugues Doily Doll Dolls dress Đan len earring easter easter card ECHARPE embellishment Embroidery ENXOVAL PARA BEBÉ ESTOLAS explosion gift card holder FAIXA PARA CABELOS fashion fathers day Felt filigrana Floral crochet - Móc hoa FLORES flower flower arrangement flowers crochet Folding paper FOLHAS food food decor frances shilliday free atc pattern free easter pattern FREE FORM free gift free instructions free pattern free quilling instructions free quilling pattern free rice free spreuer patterns fringed flower frustration fun facts Funny Galaxy Stitch Gang tay - Tất garden Gấp giấy Gấp hộp Gấp khăn - Trang trí món ăn gel grips Giầy - Dép gift gift card holder Gifts giveaway glass gloves Gói quà - gấp nơ golf GOLINHAS Google+ GORRO Gối cho bé graduation card GRÁFICOS Granny Square grape roll Hair hair clip halloween happy birthday hat hats heart Hexagon history holiday craft holiday crafts home and garden Hook Itunes jewelery jewelry Kết hạt Khăn - Mũ kirigami kite fold Knit knitting knitting pattern knot ladybug Làm + Trang trí bánh Làm đẹp Làm đồ chơi làm đồ chơi từ gỗ Làm hoa giấy Làm hoa nhựa Làm hoa vải Làm thiệp LEAVES lions gate bridge Log Cabin Square Love luck of the Irish LUMINÁRIAS LUVAS LUVINHAS PARA BEBÊ Magazine magnolia stamp make it monday make up making flower making flowers Making toys mandala Manta MANTA PARA BEBÊ MANTA PARA SOFÁ Mẫu móc Mẫu đan chi tiết Mẫu móc mẫu móc chi tiết Mẫu móc hoa MEUS MOMENTOS MEUS TRABALHOS Michelle Ewart mittens Móc khăn trải bàn Mothers Day motif Multiples myths Nail art naqg necklace needle tool Nghệ thuật Nghệ thuật cắt giấy Nhà đẹp one world one heart Origami owl owoh Pachwork painting Painting - Vẽ PANTUFAS PAP Paper paper filigree paper quilling paper tag paper weight Patchwork patriotic peg PELERINE photograph Phông nền làm ảnh pictures Pillows pink artist pink artist parade of squares pink dogwood pink flamingo pinwheel plastic POLAINA poncho Popcorn puff stitch pumpkin pumpkin cap QUADRADO quilled angel quilled c-scroll quilled coil heart quilled cross quilled double scroll quilled dress quilled eye shape quilled flower girl dress quilled flowers quilled heart quilled heart scroll quilled loose coil quilled loose scroll quilled marquis shape quilled open coil quilled open heart quilled ornament quilled palm tree quilled raindrop shape quilled s-scroll quilled snowflake quilled snowman quilled spiral shape quilled teardrop shape quilled turkey quilled valentine quilling quilling coil shapes quilling double scroll quilling instructions quilling paper quilling pattern quilling shapes quilling strips quilling supplies quilling tools Quilt RECEITA RECEITA CULINÁRIA RECEITA DE PONTOS recycle recycling RENDA DE PELO DE CABRA repair work ribbon rings rugs SACOLAS SAIAS DE CROCHE SANDÁLIAS EM CROCHÊ SAPATINHOS SAPATINHOS PARA BEBÊ Scarf scarves Scarves - Khăn scrapbooking scroll shapes sewing shawls shoes and sandals Singing skirt slippers slotted tool small kite fold snood Snowflake soap socks spiral rose spreuer spreuer flower spring SQUARE st patricks day Strawberry SUÉTER summer tag sweater Swiffer Sweeper Cover TABELAS DE MEDIDAS DE TRICO E CROCHE tablecloths tagged TAPETES. RECEITA tarjetas tea bag folding tea bag folding history teabag folding teabag folding history TENIS PARA BEBÊ Tết dây Thank you thanks thanksgiving quilling Thêu Tỉa hoa quả tight coil tight roll tip tips TOALHAS Tóc đẹp TOUCAS TOUCAS PARA BEBÊ Trang điểm Trang trí TRICO Túi xinh TÚNICA tunisian turkey Tutorial Tutorial video underwear Valentine's day valentines crafts valentines heart vancouver Video VÍDEO Video cắt may Video dạy móc video tutorial weaving wedding wedding dress winners winter quilling wood wreath XALE xerox lets say thanks YouTube