Thứ Tư, 31 tháng 12, 2008

Free Winter and Christmas Quilling Patterns


Wow! Can you believe how many patterns I have posted on this site? I know that I can't.

In an effort to make life easier for all of us, I am going to try to simplify the pattern lists for everyone. I have found many patterns along the way that I did not have a link to, so this exercise has definitely been worthwhile.

Please find a list of patterns related to Winter and Christmas. Each of these patterns would be the perfect embellishment for a card, scrapbook page, or framed art. Contact me if you have questions:


Trees and/or Christmas Trees (any of these patterns can be modified to be something other than a Christmas tree)
  • Loose Coil Christmas Tree - very easy Christmas Tree design using loose coils (not glued), can be done by children and adults alike.
  • Scroll Christmas Tree - I love the look of this tree. It is made using S-scrolls, a Heart-T-Scroll, double scrolls and kissing s-scrolls. This project will be available for a limited time.
  • Triangle Christmas Tree - basic design, using triangle shaped coils to make trees.
  • Spreuer Christmas Tree - a very clean, basic Spreuer tree with lights and a star on top
Winter and Christmas Patterns:

  • Birdhouse of Love - combines paper piecing with quilling to create a one-of-a-kind winter white and green birdhouse.
  • Winter Wreath - in the spirit of Advent, I have created a wreath to share.
  • Lovebird Birdhouse - This one has a new design of mine, my S-scroll love birds, check them out.
  • Heart throb Snowman - This guy is all dressed up and ready for a night on the town.
  • Gilded Poinsettia - this gilded paper makes this poinsettia breath taking.
  • Poinsettia - a traditional poinsettia with a fringed flower center.
  • Fancy Ornament - his is a small ornament for your scrapbook Christmas layout, or Christmas cards, or possibly for your tree.
  • Christmas Angel - This Angel is red and green and has curly hair. She also wears her heart on her sleeve. You can use this basic pattern for so many things including a baby announcement or any religious event.
  • Christmas Cross - A sweet Christmas cross with a flower in the center. This is a traditional cross shape in a non-traditional spreuer shape.
  • Snowflake Christmas Card - 5-point blue and white snowflake ornament that is attached to a stamped card.

Don't forget to check out the other free pattern links on the left hand side menu.

Enjoy!
Copyright for Personal Use Antonella DeFalco

Technorati Tags:
, , , , , , , , ,

Thứ Hai, 29 tháng 12, 2008

Free Tropical Quilling Patterns


Wow! Can you believe how many patterns I have posted on this site? I know that I can't.

In an effort to make life easier for all of us, I am going to try to simplify the pattern lists for everyone. I have found many patterns along the way that I did not have a link to, so this exercise has definitely been worthwhile.

Please find a list of patterns with a tropical theme. Each of these patterns would be the perfect embellishment for a card, scrapbook page, or framed art. Contact me if you have questions:


  • Palm Tree and Sunshine - a simple palm tree with coconuts. Perfect for a beach themed card or scrapbook page, even a funny Christmas card (perhaps santa relaxing underneath)
  • Pink Flamingo - a beautiful folded rose pink flamingo placed over a photograph
Don't forget to check out the other free pattern links on the left hand side menu.

Enjoy!
Copyright for Personal Use Antonella DeFalco

Technorati Tags: , , , , , , , ,

Free Fall Quilling Patterns


Wow! Can you believe how many patterns I have posted on this site? I know that I can't.

In an effort to make life easier for all of us, I am going to try to simplify the pattern lists for everyone. I have found many patterns along the way that I did not have a link to, so this exercise has definitely been worthwhile.

Please find a list of patterns related to Fall, Halloween, and Thanksgiving. Each of these patterns would be the perfect embellishment for a card, scrapbook page, or framed art. Contact me if you have questions:

School:


Fall / Autumn:

  • Autumn Basket - 2 patterns in one; a functional quilled basket filled with fringed flowers

Halloween:

  • Witches Hat - A zany pattern for a witches hat with green hair flowing.

Thanksgiving:

  • Turkey - Gobble Gobble... just in time for your Thanksgiving feast
Don't forget to check out the other free pattern links on the left hand side menu.

Enjoy!
Copyright for Personal Use Antonella DeFalco

Technorati Tags:
, , , , , , , , , ,

Free Flower or Floral Patterns


Wow! Can you believe how many patterns I have posted on this site? I know that I can't.

In an effort to make life easier for all of us, I am going to try to simplify the pattern lists for everyone. I have found many patterns along the way that I did not have a link to, so this exercise has definitely been worthwhile.

Please find a list of patterns related to Angels and Crosses. Each of these patterns would be the perfect embellishment for a card, scrapbook page, or framed art. Contact me if you have questions:


  • Flower Power Girl - She is a very happy "girl" made with a flower. She has great energy for the girl(s) in your life - perfect for a scrapbook page and definitely in a frame.
  • Sunburst Flower - This is a neat flower made using 2 strips of coordinating quilling strips in a spreuer design.
  • Sunburst Flower with Ladybug - One of the great things about quilling is that you can combine your quilled items to make an even more spectacular arrangement. This is an example of combining two elements.
  • Trelis with Yellow and Purple Flowers - Flowers look so elegant climbing up a trelis, here is a pattern to get your thought process flowing.
  • Gilded Poinsettia - beautiful gilded poinsettia pattern
  • Poinsettia - a traditional poinsettia with a fringed flower center
  • Autumn Basket - 2 patterns in one. First there is a versatile wicker basket pattern that can be used in many ways, this pattern shows it filled with brightly colored fringed flowers.
  • Daisy Card - this is my favorite Daisy card, the daisy is off-set on a diamond background with the stem artistically arranged such that it barely touches the card.
  • 4 Daisy Designs - 4 variations of the daisy design.
Don't forget to check out the other free pattern links on the left hand side menu.

Enjoy!
Copyright for Personal Use Antonella DeFalco

Technorati Tags: , , , , , , , ,

Free Angel and Cross Patterns


Wow! Can you believe how many patterns I have posted on this site? I know that I can't.

In an effort to make life easier for all of us, I am going to try to simplify the pattern lists for everyone. I have found many patterns along the way that I did not have a link to, so this exercise has definitely been worthwhile.

Please find a list of patterns related to Angels and Crosses. Each of these patterns would be the perfect embellishment for a card, scrapbook page, or framed art. Contact me if you have questions:


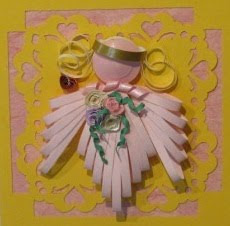
  • Christmas Angel - A different twist to the traditional Spreuer Angel. his Angel is red and green and has curly hair. She also wears her heart on her sleeve. You can use this basic pattern for so many things including a baby announcement or any religious event.
  • Angel with Quote - this beautiful pink Angel graces a frame with a quote from Luciano de Crescenzo, "We are each of us angels with only one wing, and we can only fly by embracing one another"
  • Patriarchal Cross - based on research on crosses, this is modeled after the Patriarchal cross and is made using the spreuer technique. This is a Spreuer Cross using the Patriarchal Cross design. It is augmented with delicate roses. Perfect design for Baptism, Weddings, Communions, Confirmations, Sympathy, or any religious gift or event.
  • Christmas Cross - A sweet Christmas cross with a flower in the center. A different twist on the traditional Spreuer Cross. The spreuer technique was used, but with a modified pattern to create a truly unique pattern.
Don't forget to check out the other free pattern links on the left hand side menu.

Enjoy!
Copyright for Personal Use Antonella DeFalco

Technorati Tags: , , , , , , , , ,

Free Bird and Animal Patterns


Wow! Can you believe how many patterns I have posted on this site? I know that I can't.

In an effort to make life easier for all of us, I am going to try to simplify the pattern lists for everyone. I have found many patterns along the way that I did not have a link to, so this exercise has definitely been worthwhile.

Please find a list of patterns related to Birds, Bugs, and other Cute Animals along the way. Each of these patterns would be the perfect embellishment for a card, scrapbook page, or framed art. Contact me if you have questions:


  • Patriotic Lady Bug - This little lady is all Red, White, and Blue. Just think out-of-the-box and she can be the colour of the flag of your country.
  • Happy Song Birds - These song birds have been added to a painted background, with quilled blossoms to make this tree come alive.
  • Pink Flamingo - You cannot think of summer without thinking of a Pink Flamingo. This is a folded rose version that has been mounted to a photograph.
  • Butterfly and Dogwoods - This is a perfect combination, a Spreuer Butterfly perched on a beautiful picture of a Pink Dogwood. This includes instructions and a link to the actual photograph so you can make the entire project on your own!
  • Teardrop Butterfly - This butterfly is made using standard marquis and teardrop shapes. You can change the color scheme to match your card or just your mood!
  • Thanksgiving Turkey - Gobble, Gobble! He is ready to join your Thanksgiving feast.


Birdhouse Theme:
Don't forget to check out the other free pattern links on the left hand side menu.

Enjoy!
Copyright for Personal Use Antonella DeFalco

Technorati Tags: , , , , , ,

Free Love and Wedding Patterns


Wow! Can you believe how many patterns I have posted on this site? I know that I can't.

In an effort to make life easier for all of us, I am going to try to simplify the pattern lists for everyone. I have found many patterns along the way that I did not have a link to, so this exercise has definitely been worthwhile.

Please find a list of patterns related to Love and Weddings and the such. Each of these patterns would be the perfect embellishment for a card, scrapbook page, or framed art. Contact me if you have questions:
  • Flowers of Love - Beautiful S-Scroll heart pattern just in time for Valentine's day or any love filled occasion.
  • Wedding Dress - An elegant quilled wedding dress and bouquet perfect for the bride on her wedding day. This is great to add to your bridal shower or wedding card and is the perfect embellishment for your scrapbook page.
  • Flower Girl Dress - This sweet little dress is so cute. She carries her own special little bouquet for her trip down the aisle. This link will take you to another site where my pattern is posted.
  • Wedding Cake - What wedding would be complete without the cake? Try this yummy one on for size. This is done in a style I called "Embellishment Quilling"
  • Shower or Wedding Card - Who doesn't love square cards? This one is embellished with some simple scrolls to really dress it up. This is a really easy way to dress up a card.
Don't forget to check out the other free pattern links on the left hand side menu.
Enjoy!
Copyright for Personal Use Antonella DeFalco

Technorati Tags: , , , , , , , , , ,

Chủ Nhật, 28 tháng 12, 2008

Free Quilling Scroll Shape Instructions

quilling scroll shapes
Scrolls, scrolls, and more scrolls... They are so much fun to make and use in your quilling.


The following are links to instructions that I have posted for making these shapes:


Free Quilling Coil or Circle Shape Instructions

quilling coil shape instructions

The traditional shapes used in quilling are the coil shapes. Sometimes people will refer to them as circle shapes, but this is not a common reference. Most of the quilling that is done uses these basic shapes.

The following are links to instructions that I have posted for making these shapes:


Don't forget to check out the other free shape instructions and pattern links on the left hand side menu!


Kissing S-Scroll Heart Instructions


I really love S-Scrolls - they are so delicate and make any quilled item look so pretty. This is one of my favorite ways to use them, they do double duty as a sweet Heart Scroll. A friend of mine, Molly Smith, calls these beauties Open Hearts with Tails).

They are very easy to make.... Just a 2 step process

First, make 2 S-Scrolls
Second, place them facing each other and glue them at the top and bottom

The result is a simple Kissing S-Scroll Heart

Enjoy!
Copyright for Personal Use Antonella DeFalco

Technorati Tags: , , , , , ,

Thứ Ba, 16 tháng 12, 2008

Quilling Spiral Shape Instructions

quilling spiral shape
Instructions for making the Spiral shape are as follows (note: These instructions can be used no matter what length or width paper you are using):


  • To make this shape a needle tool, dowel, knitting needle or some such tool to create the spiral shape.

  • A trick is to moisten the end of the strip, either by using a moist towel or sponge.

  • Take the quilling strip and wrap it around the selected tool.

  • Start at the tip and continue to wrap up the length of the tool.

  • When approaching the end or handle, start sliding the paper off the front of the tool so that you can continue to wrap the spiral shape until the end of the quilling strip.

  • A neat use is to take very long strips (by attaching them end to end). Create a long spiral and outline a photo. Note: it is not an easy task to keep the spiral even when using long strips, but worth the effort.
Enjoy!
Copyright for Personal Use Antonella DeFalco

Technorati Tags:
, , , , , , , ,

Quilling Double Scroll and Double Scroll with Tail Instructions

quilling double scroll

The following instructions are for the Double Scroll and a variation of the same pattern Double Scroll with Tail.

Instructions for making the Double Scroll shape are as follows (note: These instructions can be used no matter what length or width paper you are using):


  • Take the quilling strip and fold it nearly in half, leave about 1/8 in (.3 cm) between the tips of the folded paper.
  • Begin by conditioning the quilling strip. This is done by running your fingernail or needle tool along the end of the strip. The paper will begin to curl as the fibers in the paper are broken down.
  • Note that when conditioning the strip, do so on both ends of the "unequal-V" so that each end is curved in the same direction outward

  • Place the quilling paper in the slot at the very top of your slotted tool or at the top of your needle tool or pin.

  • Holding the loose end of the paper in one hand and your tool in the other hand, begin turning the your tool, gently pulling the paper, toward the center of the strip (the valley of the "V").
  • The paper will begin turning as the tool grabs the paper. Roll the paper toward the fold starting with the shorter side.
  • Repeat with the other end of the strip, turning or curling the strip in the same direction.
  • They should both the rolled in the same direction on the same side so that you end up with 2 scrolls (one on top of the other).
  • See the picture for guidance.


quilling double scroll with tail
Instructions for making the Double Scroll with Tail shape are very similar to the instructions above (note: These instructions can be used no matter what length or width paper you are using):


  • Take the quilling strip and fold it nearly in half, leave about 1/8 in (.3 cm) between the tips of the folded paper.
  • Begin by conditioning the quilling strip. This is done by running your fingernail or needle tool along the end of the strip. The paper will begin to curl as the fibers in the paper are broken down.
  • Note that when conditioning the strip, do so on both ends of the "unequal-V" so that each end is curved in the same direction outward.

  • Glue the folded end.
  • Begin rolling the folded end. Make one or two turns. This is the "tail" of the double scroll.
  • Then begin rolling the loose ends. Place the quilling paper in the slot at the very top of your slotted tool or at the top of your needle tool or pin.

  • Holding the loose end of the paper in one hand and your tool in the other hand, begin turning the your tool, gently pulling the paper, in the opposite direction of the tail.
  • The paper will begin turning as the tool grabs the paper. Roll the paper toward the fold starting with the shorter side.
  • Repeat with the other end of the strip, turning or curling the strip in the same direction.
  • They should both the rolled in the same direction on the same side so that you end up with 2 scrolls (one on top of the other) and a "tail" that curls in the opposite direction.
  • See the picture for guidance.


Enjoy!
Copyright for Personal Use Antonella DeFalco

Technorati Tags: , , , , ,

Thứ Hai, 15 tháng 12, 2008

Quilling Heart Scroll or Open Heart Shape Instructions

quilling heart scroll open heart shape
The Heart Scroll or Open Heart gets its name from the shape it takes when completed, as can be seen from the picture, it looks like a heart


Instructions for making the Heart Scroll or Open Heart shape are as follows (note: These instructions can be used no matter what length or width paper you are using):


  • Take the quilling strip and fold it in half, creating a "V"
  • Begin by conditioning the quilling strip. This is done by running your fingernail or needle tool along the end of the strip. The paper will begin to curl as the fibers in the paper are broken down.
  • Note that when conditioning the strip, do so on both ends of the "V" so that each end is curved toward the center.

  • Place the quilling paper in the slot at the very top of your slotted tool or at the top of your needle tool or pin.

  • Holding the loose end of the paper in one hand and your tool in the other hand, begin turning the your tool, gently pulling the paper, toward the center of the strip (the valley of the "V").
  • The paper will begin turning as the tool grabs the paper.
  • Repeat with the other end of the strip, turning or curling the strip toward the center. When complete, both curled ends will touch.
  • Adjust the heart to the needed size by pulling the coils away from the center. This can be done using a needle tool or a pin placed in the center of the coils and gently pulling them away from the center.
  • In the picture, both ends are approximately the same size, they do not have to be. One end can be smaller than the other. This is a personal choice and may also depend on how the shape will be used.


Enjoy!
Copyright for Personal Use Antonella DeFalco

Technorati Tags: , , , , , ,

Quilling C-Scroll Shape Instructions


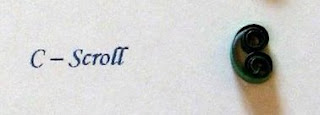
The C-Scroll gets its name from the shape it takes when completed, as can be seen from the picture, it looks like a "C"


Instructions for making the C-Scroll shape are as follows (note: These instructions can be used no matter what length or width paper you are using):


  • Begin by conditioning the quilling strip. This is done by running your fingernail or needle tool along the end of the strip. The paper will begin to curl as the fibers in the paper are broken down.

  • Note that when conditioning the strip, do so on both ends so that each end is curved in the same direction (creating a slight "C" curved shape)


  • Place the quilling paper in the slot at the very top of your slotted tool or at the top of your needle tool or pin.


  • Holding the loose end of the paper in one hand and your tool in the other hand, begin turning the your tool, gently pulling the paper, toward the center of the strip.

  • The paper will begin turning as the tool grabs the paper.

  • Repeat with the other end of the strip, turning or curling the strip in the same direction.

  • In the picture, both ends are approximately the same size, they do not have to be. One end can be smaller than the other. This is a personal choice and may also depend on how the shape will be used.
  • Note: If this shape is turned 90 degrees, it will appear to be a "U"

With these Scroll shapes, since you are not gluing the ends, it is not necessary that you tear the end. Often times, if it is a shape where the end is visible, cut the end at an angle so that it tapers. Otherwise, tearing or cutting produce similar effects as the end is in the center of the shape and is generally not visible.

Quilling S-Scroll Shape Instructions

quilling s-scroll shape
The S-Scroll gets its name from the shape it takes when completed, as can be seen from the picture, it looks like an "S"


Instructions for making the S-Scroll shape are as follows (note: These instructions can be used no matter what length or width paper you are using):


  • Begin by conditioning the quilling strip. This is done by running your fingernail or needle tool along the end of the strip. The paper will begin to curl as the fibers in the paper are broken down.

  • Note that when conditioning the strip, do so on both ends so that one end is curved one direction and the other end is curved in the other direction (creating a slight "S" curved shape)


  • Place the quilling paper in the slot at the very top of your slotted tool or at the top of your needle tool or pin.


  • Holding the loose end of the paper in one hand and your tool in the other hand, begin turning the your tool, gently pulling the paper, toward the center of the strip.

  • The paper will begin turning as the tool grabs the paper.

  • Repeat with the other end of the strip, turning or curling the strip in the opposite direction.
  • In the picture, both ends are approximately the same size, they do not have to be. One end can be smaller than the other. This is a personal choice and may also depend on how the shape will be used.

With these Scroll shapes, since you are not gluing the ends, it is not necessary that you tear the end. Often times, if it is a shape where the end is visible, cut the end at an angle so that it tapers. Otherwise, tearing or cutting produce similar effects as the end is in the center of the shape and is generally not visible.

Quilling Shape Marquis, Marquise, or Eye Shape Instructions

quilled marquis marquise eye shape
The marquis / marquise or eye shape is used in a lot of flower and petal designs and also when doing fill-in type work.


Instructions for making the Teardrop or Raindrop shape are as follows (note: These instructions can be used no matter what length or width paper you are using):


  • Begin by conditioning the quilling strip. This is done by running your fingernail or needle tool along the end of the strip. The paper will begin to curl as the fibers in the paper are broken down.


  • Place the quilling paper in the slot at the very top of your slotted tool or at the top of your needle tool or pin.


  • Holding the loose end of the paper in one hand and your tool in the other hand, begin turning the your tool gently pulling the paper.


  • The paper will begin turning as the tool grabs the paper.


  • Keep an even tension. For this shape do not pull tightly, keep a looser tension so that the shape will open up when pulled off the tool.


  • Keep the edges of the wound paper as even as possible. This prevents creating a little pop-up in the center of your shape. Some people will call this a belly or a tornado.


  • When you get to the end of the strip of paper, pull the paper off of the tool. If using the slotted tool, while holding the end tight slightly turn the slotted tool approximately 1/4 turn in the opposite direction so that the paper releases from the slot.


  • After pulling the paper off, let the coil open up.


  • Carefully glue the end of the paper, using just a small amount (dab) of glue, and pinch the glued end, creating a point on one side and leaving a rounded end opposite the point. This creates the teardrop shape.

  • Take the teardrop shape, and while holding the pinched end in your hand and pinch the opposite end.

  • Hold the coil and pinch first one end then the other end holding both pinched ends, one in each hand, at the same time.


  • When pinching use thumb and index finger.
Enjoy!
Copyright for Personal Use Antonella DeFalco

Technorati Tags: , , , , , ,

Quilling Shape Heart Coil Shape Instructions

quilled heart shape
Instructions for making the Heart (coil) shape are as follows (note: These instructions can be used no matter what length or width paper you are using):

  • Begin by conditioning the quilling strip. This is done by running your fingernail or needle tool along the end of the strip. The paper will begin to curl as the fibers in the paper are broken down.

  • Place the quilling paper in the slot at the very top of your slotted tool or at the top of your needle tool or pin.

  • Holding the loose end of the paper in one hand and your tool in the other hand, begin turning the your tool gently pulling the paper.

  • The paper will begin turning as the tool grabs the paper.

  • Keep an even tension. For this shape do not pull tightly, keep a looser tension so that the shape will open up when pulled off the tool.

  • Keep the edges of the wound paper as even as possible. This prevents creating a little pop-up in the center of your shape. Some people will call this a belly or a tornado.

  • When you get to the end of the strip of paper, pull the paper off of the tool. If using the slotted tool, while holding the end tight slightly turn the slotted tool approximately 1/4 turn in the opposite direction so that the paper releases from the slot.

  • After pulling the paper off, let the coil open up.

  • Carefully glue the end of the paper, using just a small amount (dab) of glue, and pinch the glued end, creating a point on one side and leaving a rounded end opposite the point. This creates the teardrop shape.

  • Take the teardrop shape, and while holding the pinched end in your hand, press in from the top (or rounded part of the teardrop).

  • This will create the indentation at the top to make it look like a heart.

  • When pinching use thumb and index finger.

Enjoy!
Copyright for Personal Use Antonella DeFalco

Technorati Tags: , , , , , ,

Quilling Shape Teardrop or Raindrop Shape Instructions

quilling teardrop or raindrop shape
The teardrop shape is used in a lot of flower designs and also when doing fill-in type work.


Instructions for making the Teardrop or Raindrop shape are as follows (note: These instructions can be used no matter what length or width paper you are using):


  • Begin by conditioning the quilling strip. This is done by running your fingernail or needle tool along the end of the strip. The paper will begin to curl as the fibers in the paper are broken down.

  • Place the quilling paper in the slot at the very top of your slotted tool or at the top of your needle tool or pin.

  • Holding the loose end of the paper in one hand and your tool in the other hand, begin turning the your tool gently pulling the paper.

  • The paper will begin turning as the tool grabs the paper.

  • Keep an even tension. For this shape do not pull tightly, keep a looser tension so that the shape will open up when pulled off the tool.

  • Keep the edges of the wound paper as even as possible. This prevents creating a little pop-up in the center of your shape. Some people will call this a belly or a tornado.

  • When you get to the end of the strip of paper, pull the paper off of the tool. If using the slotted tool, while holding the end tight slightly turn the slotted tool approximately 1/4 turn in the opposite direction so that the paper releases from the slot.

  • After pulling the paper off, let the coil open up.

  • Carefully glue the end of the paper, using just a small amount (dab) of glue, and pinch the glued end, creating a point on one side and leaving a rounded end opposite the point.

  • When pinching use thumb and index finger.


Quilling Open Coil or Loose Scroll Instructions

quilling open coil loose scroll shape

These instructions are for making the Loose Coil Shape and the Open Coil Shape.


Instructions for making the Loose Scroll or Open Coil shape are as follows (note: These instructions can be used no matter what length or width paper you are using):

  • Begin by conditioning the quilling strip. This is done by running your fingernail or needle tool along the end of the strip. The paper will begin to curl as the fibers in the paper are broken down.


  • Place the quilling paper in the slot at the very top of your slotted tool or at the top of your needle tool or pin.


  • Holding the loose end of the paper in one hand and your tool in the other hand, begin turning the your tool gently pulling the paper.


  • The paper will begin turning as the tool grabs the paper.


  • Keep an even tension. For this shape do not pull tightly, keep a looser tension so that the shape will open up when pulled off the tool.


  • Keep the edges of the wound paper as even as possible. This prevents creating a little pop-up in the center of your shape. Some people will call this a belly or a tornado.


  • When you get to the end of the strip of paper, pull the paper off of the tool. If using the slotted tool, while holding the end tight slightly turn the slotted tool approximately 1/4 turn in the opposite direction so that the paper releases from the slot.


  • After pulling the paper off, let the coil open up.


  • Do not glue the end, this will allow the coil to remain rounded and open with a tail.


Since the end is not glued, it is not necessary that you tear the end. Often times, if it is a shape where the end is visible, cut the end at an angle so that it tapers and gives a more polished look. Tearing or cutting produce similar effects as the end is in the center of the shape and is generally not visible.

Enjoy!
Copyright for Personal Use Antonella DeFalco

Technorati Tags: , , , , , ,

Quilling Loose Coil Instructions

quilling loose coil shape
Instructions for making the Loose Coil shape are as follows (note: These instructions can be used no matter what length or width paper you are using):

  • Begin by conditioning the quilling strip. This is done by running your fingernail or needle tool along the end of the strip. The paper will begin to curl as the fibers in the paper are broken down.


  • Place the quilling paper in the slot at the very top of your slotted tool or at the top of your needle tool or pin.


  • Holding the loose end of the paper in one hand and your tool in the other hand, begin turning the your tool gently pulling the paper.


  • The paper will begin turning as the tool grabs the paper.


  • Keep an even tension. For this shape do not pull tightly, keep a looser tension so that the shape will open up when pulled off the tool.


  • Keep the edges of the wound paper as even as possible. This prevents creating a little pop-up in the center of your shape. Some people will call this a belly or a tornado.


  • When you get to the end of the strip of paper, pull the paper off of the tool. If using the slotted tool, while holding the end tight slightly turn the slotted tool approximately 1/4 turn in the opposite direction so that the paper releases from the slot.


  • After pulling the paper off, let the coil open up.


  • Carefully glue the end of the paper, using just a small amount (dab) of glue. Do not pinch the glued end, this will retain the rounded / circle shape.


Enjoy!
Copyright for Personal Use Antonella DeFalco

Technorati Tags: , , , , ,

Thứ Năm, 27 tháng 11, 2008

December Quilling Patterns

Welcome to the December 2008 Accord Quilling Calendar Pattern Listing

I am providing you a list of all the patterns and the name of the artist who graciously allowed Accord to print them.

December 2008 Accord Calendar Projects

1 - NOEL (Artist: Malinda Johnston)
2 - Candies (Artist: Vikki Nimmo, www.quillessentials.com)
3 - Snowman and Tree (Artist: Kay Charles)
4 - Ornament (Artist: Madaline Weber)
5 - Christmas Lights with Extra Bulbs (Artist: Suzzy Howard)
6/7 - Christmas Wreath (Artist: Vikki Levy)
8 - Christmas Stocking (Artist: Toni Jarvis, www.3amdesigns.blogspot.com)
9 - Bow with Holly (Artist: Holly Miller)
10 - Balloon / Ornament (Artist: Caroline Mach)
11 - Santa's Hat (Artist: Joanne Schneider)
12 - JOY (Artist: Licia Politis)
13/14 - Angel Tag (Artist: Bobbye Singer)
15 - Christmas Tree with Gifts (Artist: Jill VanDieren)
16 - Hanukkah Menorah (Artist: Georgia Robinson)
17 - Star of David (Artist: Patricia Caputo, www.whimsiquills.com)
18 - Candle and Cup (Artist: Stephanie Lucy Djunaedi)
19 - Mistletoe (Artist: Molly Smith, www.mollysmith.com)
20/21 - Elf Tag (Artist: Bobbye Singer)
22 - Candy Cane and Tiny Angel (Artist: Jill VanDieren)
23 - Poinsettia (Artist: Patricia Hummel)
24 - Wreath (Artist: Patricia Caputo, www.whimsiquills.com)
25 - Nativity (Artist: Susan Harl Custer)
26 - Kwanza Candles (Artist: Molly Smith, www.mollysmith.com)
27/28 - Kinara (Kwanza Candleholder) (Artist: Molly Smith, www.mollysmith.com)
29 - Victorian Angel (Artist: Joan Kiuru)
30 - Cocktail (Artist: Toni Jarvis, www.3amdesigns.blogspot.com)
31 - Happy New Year! (Artist: Anne-Marie Peltier)

Enjoy!
Antonella

Technorati Tags: , , , ,

Thứ Bảy, 15 tháng 11, 2008

Summer Tag Swap

summer scrapbook tag

I know that I usually post about quilling projects, but I wanted to indulge in some of my other interests for a moment. This is a picture of a Summer Tag Swap that I participated in. This was for one of the groups I belong to. The only guideline is that it had to be a Summer Theme.

I hand cut the tag, I cut a rectangle and then shaped the top into a rounded triangle type shape and punched a single hole in the top. I then punched 3 additional holes along the left hand side near the top.

I picked 2 ribbons that coordinated in shades of blue and green (I thought they reminded me of a beach-y summer color). For the top hole I took a strip of both ribbons and tied them, and along the side I alternated the ribbons.

The bird was inspired by some stamps that I saw and just that 60's or 70's look in general. I sketched out a bird shape and created a template and then traced it out on patterned paper. I use the ink-to-paper method and inked the outline of the bird in this beautiful Tsukineko glimmer stamp pad. You cannot see it in the paper, but it has this glistening appearance.

Then I took my beach theme further and created a torn beach and waves look by tearing shades of green and sand. The sand also has an added glimmer with a gold and bronze mix.

The epoxy stickers are from Michael's - I thought the shells added a nice touch and the "Enjoying Life" should be everyone's mantra for the summer months - lol.

Finally, the bird was attached with a pop dot for added dimension.

The weather here is distinctly rainy and getting cold, so I thought this would warm us up and give us a bit of sunshine.


Enjoy!
Copyright for Personal Use Antonella DeFalco

Technorati Tags: , , ,

Thứ Hai, 27 tháng 10, 2008

November Quilling Patterns

Welcome to the November 2008 Accord Quilling Calendar Pattern Listing

I am providing you a list of all the patterns and the name of the artist who graciously allowed Accord to print them.

November 2008 Accord Calendar Projects

1/2 - Button Mushrooms (Artist: Holly Miller)
3 - Apples (Artist: Stephanie Lucy Djunaedi)
4 - Mushroom and Peas (Artist: Cathy Schlim)
5 - Pumpkin and Harvest Corn (Artist: Constance Godleski)
6 - Grapes (Artist: Constance Godleski)
7 - Flowers (Artist: Patricia Caputo, www.whimsiquills.com)
8/9 - Pumpkin (Artist: Gerry Stafford)
10 - Porchino Mushroom (Artist: Gerry Stafford)
11 - Pomegranate (Artist: Stephanie Lucy Djunaedi)
12 - Pineapple (Artist: Stephanie Lucy Djunaedi)
13 - Cherries (Artist: Stephanie Lucy Djunaedi
14 - Grapefruit (Artist: Stephanie Lucy Djunaedi)
15/16 - Quill and Ink Inspiration Piece (Artist: Sherry Rodehaver, www.picturetrail.com/sherry_rodehaver)
17 - Feather (Artist: Sheryl Scott, www.simplyelegantcreations.net)
18 - Native Headdress (Artist: Sheryl Scott, www.simplyelegantcreations.net)
19 - Pilgrim Hat (Artist: Cathy Schlim)
20 - Turkey (Artist: Constance Godleski)
21 - Grapevine (Artist: Jane Cleveland)
22/23 - Cornucopia (Artist: Licia Politis)
24 - Gingerbread Man (Artist: Patricia Caputo, www.whimsiquills.com)
25 - Present (Artist: Debbie Martinez)
26 - Christmas Swag (Artist: Fredricka Whitman)
27 - Candle with Holly (Artist: Patricia Caputo, www.whimsiquills.com)
28 - Holly Leaves (Artist: Cathy Schlim)
29/30 - Licorice Allsorts (Artist: Licia Politis)


Enjoy!
Antonella

Technorati Tags: , , , ,

Thứ Sáu, 17 tháng 10, 2008

Free Quilled Witch Hat


This is a fun project for Halloween. A Witches Hat, with some great green hair.

Hat
1 - 24 in (60.8 cm) Black Shaped Teardrop
1 - 12 inch (30.4 cm) Black Shaped Teardrop
4 - 1.5 inch (3.8 cm) Purple Spirals (arrange in flower shape and attach to hat)

Hair
8 Green (6 inch, 15.2 cm) Spiral, cut to 1/16 inch, .15 cm wide

Arrange as shown in picture.

Enjoy!
Copyright for Personal Use Antonella DeFalco

Technorati Tags: , , , , , ,

Thứ Tư, 15 tháng 10, 2008

What is Halloween Anyway?

I know, it is a bit early for Halloween, but I wanted to share a little about Halloween before I share some quilling projects for everyone.

I guess there is no definitive answer for how Halloween came about, but this is one thought.

Several sources say that it dates back to the Celts who believed that on October 31st the spirits of the dead walk the earth / come out of their tombs. They would do things to frighten the ghosts like wearing scary costumes and lighting fires. They also had lucky foods that they ate like apples and nuts.

Many of the things we associate with Halloween are from the Celts. Black is the color of winter and long nights and Orange is the color of the harvest. Black cats were thought to have special powers (makes me want to do something on superstitions).

This Celtic tradition was married with the Christian practices after the Romans invaded. In the Christian tradition, November 1st was All Saints' Day (All Hallows' Day). The mass that the Catholic Church celebrated on November 1st was the mass of all the hallowed (saintly people). So, this meant that October 31st was All Hallows' Eve which later became Halloween.

Happy Halloween!


Technorati Tags:

Chủ Nhật, 12 tháng 10, 2008

October Quilling Patterns

Welcome to the October 2008 Accord Quilling Calendar Pattern Listing

I am providing you a list of all the patterns and the name of the artist who graciously allowed Accord to print them. These patterns are in the 2008 Accord Quilling Pattern. If the pattern is mine, I have included a link to the pattern online. If I know where a pattern can be found, I will provide a link to that pattern also.

October 2008 Accord Calendar Projects

1 - Autumn Leaves (Artist: Gerry Stafford)
2 - Tropical Leaves (Artist: Stephanie Lucy Djunaedi)
3 - Ferns (Artist: Holly Miller)
4/5 - Flower Basket Inspiration Piece (Artist: Kathy Inzaloca)
6 - Saguaro Cactus (Artist: Gerry Stafford)
7 - Cactus with Butterfly (Artist: Jill VanDieren)
8 - Boot (Artist: Patricia Hummel)
9 - Vine (Artist: Stephanie Lucy Djunaedi)
10 - Wheat (Artist: Jane Cleveland)
11/12 - Pumpkin Wagon (Artist: Jane Cleveland)
13 - Pumpkin Boy (Artist: Linda Krieg, www.krazyquilling.com)
14 - Jack-o-Lantern (Artist: Toni Jarvis, www.3amdesigns.blogspot.com)
15 - Spider with Web (Artist: Vikki Nimmo, www.quillessentials.com)
16 - Pumpkins (Artist: Joanne Schneider)
17 - Ghost and Cauldron (Artist: Paige Meeker)
18/19 - Skeleton (Artist: Debbie Martinez)
20 - Scarecrow (Artist: Terri Denis)
21 - Moon (Artist: Debbie Martinez)
22 - Robot (Artist: Suzzy Howard)
23 - Witch (Artist: Suzzy Howard)
24 - Pumpkin Patch (Artist: Terri Denis)
25/26 - Candy Toppers (Artist: Molly Smith, www.mollysmith.com)
27 - Cat (Artist: Terri Denis)
28 - Candy Corn (Artist: Suzzy Howard)
29 - Jester (Artist: Susan Harl Custer)
30 - Mask (Artist: Gail Freed)
31 - Black Cat (Artist: Toni Jarvis, www.3amdesigns.blogspot.com)


Enjoy!
Antonella

Technorati Tags: , , , ,

Chủ Nhật, 7 tháng 9, 2008

Free Quilling Pattern School Bus


For all of you who have a child going on a schoolbus, here is a cute project just for you. After he was finished, he looked like he had developed a personality, what do you think? I think he looks like he has a face. He could go on a card or scrapbook page to commemorate their first day on the bus!


I call this: Safety First School Bus

Body

  • 30 Yellow (3 in, 7.6 cm) Loose Coil, cut to 1/16 inch, .15 cm wide

  • 6 Yellow (6 in, 15.2 cm) Loose Coil, cut to 1/16 inch, .15 cm wide

  • 1 Yellow (3 in, 7.6 cm) Tight Coil (for Tail pipe), cut to 1/16 inch, .15 cm wide

  • 1 Yellow (3 in, 7.6 cm) Teardrop (for Front Bumper), cut to 1/16 inch, .15 cm wide

Windows

  • 2 White (6 in, 15.2 cm) Loose Coil, cut to 1/16 inch, .15 cm wide

  • 2 White (6 in, 15.2 cm) Half Moon (place over windows), cut to 1/16 inch, .15 cm wide
Door

  • 6 White (3 in, 7.6 cm) Loose Coil, cut to 1/16 inch, .15 cm wide

  • 1 White (6 in, 15.2 cm) Half Moon (place over door), cut to 1/16 inch, .15 cm wide
Wheels

  • 1 White (3 in, 7.6 cm) + 1 Black (12 in, 30.4 cm) Loose Coil (make 2),
    cut to 1/16 inch, .15 cm wide

  • 2 Yellow (6 in, 15.2 cm) Half Moon (place over wheel), cut to 1/16 inch, .15 cm wide
Use the picture as a guide for placement of the shapes

Be safe :-)


Enjoy!
Copyright for Personal Use Antonella DeFalco

Technorati Tags: , , , , , , ,

Thứ Năm, 4 tháng 9, 2008

What Weight Paper Should I Use for Quilling?

I had someone ask me about paper weight, specifically, what weight paper should she use when cutting her own paper? What a brave soul she is to cut her own.

Here is my response:

Hello Sylvia,

This is not an easy question to answer. I will share you my thoughts/experience and encourage you to experiment. Yes, experiment, play, you may find something that you hadn't thought of that looks incredible - and don't forget to share your exeperiences here.

Paper weights in the US can be deceiving, from what I have read here, the US measurement of pounds (#) can be deceiving. The same number in #s can be used for thicker and thinner paper. They use the example of 80# Cover and 80# Text. Text weight paper is thinner. So, keep that in mind as well. I am US based, so I will talk in terms of what I use here.

The easiest paper to cut is the "copy" paper, generally 20# - 24# weight. I use this paper when punching, it can be a little bit thin for making coils, but this doesn't mean that you shouldn't use it. They generally are the same color on both sides and you can get a huge variety of colors. I will shortly be posting instructions for making the wild or spiral roses, and I used this weight paper for the examples I have.

I like the scrapbooking paper. Most of this paper is white on one side, so it will look like those quilling strips that are 2-toned with white on the back. You can always alter this by stamping an accent color on the back of the strip if you don't want the white. This is generally a 60# weight on the scrapbook packs that show the paper weight. Please Note: I do not mean the heavy cardstock, as that is a little thick and the coils don't roll as nicely, I am talking the thinner weights.

Many of the quillers I know who frame lots of invitations have pointed me in the direction of using envelopes. You know how you get a bill and the inside of the envelope has that black or blue design so that you cannot see through the envelope? That paper makes fantastic fringed flowers. When you get a nice card with a colored envelope, use that paper as well. This weight (not sure what it is) is great for punched and fringed flowers. You hit a bonus when the inside is lined gold or silver metalic. The envelopes work well to make coils, but the downside is that there is not that much paper to work from.

Magazines and those mailers you receive with ADs also make nice variations in your quilled strips. They can run the gambit with the weight of the paper and the quality, but if you get a good quality it will work for you. If you go this route, you will have to be ok with the variation in colors, etc as they are not one solid color. But like above, they make for interesting fringed flowers and generally cut nicely.

Vellum - I have seen some examples of vellum punched and coiled flowers. The trick is be the glue. Just like a metalic or shiny paper I would recommend a thicker/tackier glue so that it holds. You will need to hold your glue in place longer than you might normally to give the glue a chance to adhere to the more slipery surface.

A few final thoughts:

Always keep in mind the grain of the paper. According to my friend Sherry, when you cut paper, it is best to cut against the grain because the coils will hold better when rolled against the grain. Think about when you fold a piece of cardstock to make a card. If you fold it and you get a nice crisp edge you are folding with the grain, if you get a bumpy fold, you are folding against the grain. So, how do you know which direction the grain goes? The direction of the grain is usually the 2nd number in your paper size. For instance, an 8-1/2 x 11 inch sheet of paper has the grain going parallel to the 11 inch side.

One final thought, in addition to the weight of the paper, you may want to check to make sure the color on the paper doesn't bleed, especially if you use a water based glue. You can test this by dabbing a bit of water in a test area of your paper and see what happens.

PS - I have written this in the past, I don't have a great track record of cutting straight lines so I generally don't cut my own strips, I have found that for the time and energy, I can get enough supplies to last me quite a long time for about $20 - $30 (including shipping and handling in the US) so I generally go this route.

The manufacturers also produce sheets of paper that match their quilling strips which work well with punches, or alternatively could also be cut down into strips.

Enjoy!
Copyright for Personal Use Antonella DeFalco

Technorati Tags: , , ,

Labels

Accessories Adult English afghan afghan stitch AGULHAS Amigurumi amirugumi Ảnh anniversary applique Art artist artist trading card Árvore de Natal em croche atc autumn basket award Ẩm thực baby crochet Baby Dress baby knitting Baby learn back to school bag Bags BAKTUS Ballet Bun Cover balloons BARRADOS Bead Beads Bear Ear Hat BEBÊS belts Berry bird birdhouse birthday card blanket blog candy BLUSAS BOINA BOLEROS BOLSAS books booties BORBOLETAS bouquet bows boxes boy card bracelet breast cancer bridal shower bunny Búp bê butterfly CACHECOL CACHECOLAR cake calendar candles candy Candy Cane capilano suspension bridge card card drive card making Cards cards for kids carving carving fruit carving fruits CASACO INFANTI CASACOS CASAQUINHO EM CROCHE CASAQUINHO EM TRICO CASAQUINHO PARA BEBÊ Cắm hoa Cắt may CHAPEU cheerleader childrens crafts christmas quilling clay COLAR COLAR DE FLORES COLETE coloring copyright CORDÃO corned beef CORUJUINHAS crafts CROCHE COM SAQUINHOS PLASTICOS CROCHE IRLANDES crochet Crochet Geek crochet pattern cross cross stitch Curtain cutting paper daisy DECORAÇAO Detail crochet - Móc chi tiết Dicionário de Trico - Inglês/Portugues Doily Doll Dolls dress Đan len earring easter easter card ECHARPE embellishment Embroidery ENXOVAL PARA BEBÉ ESTOLAS explosion gift card holder FAIXA PARA CABELOS fashion fathers day Felt filigrana Floral crochet - Móc hoa FLORES flower flower arrangement flowers crochet Folding paper FOLHAS food food decor frances shilliday free atc pattern free easter pattern FREE FORM free gift free instructions free pattern free quilling instructions free quilling pattern free rice free spreuer patterns fringed flower frustration fun facts Funny Galaxy Stitch Gang tay - Tất garden Gấp giấy Gấp hộp Gấp khăn - Trang trí món ăn gel grips Giầy - Dép gift gift card holder Gifts giveaway glass gloves Gói quà - gấp nơ golf GOLINHAS Google+ GORRO Gối cho bé graduation card GRÁFICOS Granny Square grape roll Hair hair clip halloween happy birthday hat hats heart Hexagon history holiday craft holiday crafts home and garden Hook Itunes jewelery jewelry Kết hạt Khăn - Mũ kirigami kite fold Knit knitting knitting pattern knot ladybug Làm + Trang trí bánh Làm đẹp Làm đồ chơi làm đồ chơi từ gỗ Làm hoa giấy Làm hoa nhựa Làm hoa vải Làm thiệp LEAVES lions gate bridge Log Cabin Square Love luck of the Irish LUMINÁRIAS LUVAS LUVINHAS PARA BEBÊ Magazine magnolia stamp make it monday make up making flower making flowers Making toys mandala Manta MANTA PARA BEBÊ MANTA PARA SOFÁ Mẫu móc Mẫu đan chi tiết Mẫu móc mẫu móc chi tiết Mẫu móc hoa MEUS MOMENTOS MEUS TRABALHOS Michelle Ewart mittens Móc khăn trải bàn Mothers Day motif Multiples myths Nail art naqg necklace needle tool Nghệ thuật Nghệ thuật cắt giấy Nhà đẹp one world one heart Origami owl owoh Pachwork painting Painting - Vẽ PANTUFAS PAP Paper paper filigree paper quilling paper tag paper weight Patchwork patriotic peg PELERINE photograph Phông nền làm ảnh pictures Pillows pink artist pink artist parade of squares pink dogwood pink flamingo pinwheel plastic POLAINA poncho Popcorn puff stitch pumpkin pumpkin cap QUADRADO quilled angel quilled c-scroll quilled coil heart quilled cross quilled double scroll quilled dress quilled eye shape quilled flower girl dress quilled flowers quilled heart quilled heart scroll quilled loose coil quilled loose scroll quilled marquis shape quilled open coil quilled open heart quilled ornament quilled palm tree quilled raindrop shape quilled s-scroll quilled snowflake quilled snowman quilled spiral shape quilled teardrop shape quilled turkey quilled valentine quilling quilling coil shapes quilling double scroll quilling instructions quilling paper quilling pattern quilling shapes quilling strips quilling supplies quilling tools Quilt RECEITA RECEITA CULINÁRIA RECEITA DE PONTOS recycle recycling RENDA DE PELO DE CABRA repair work ribbon rings rugs SACOLAS SAIAS DE CROCHE SANDÁLIAS EM CROCHÊ SAPATINHOS SAPATINHOS PARA BEBÊ Scarf scarves Scarves - Khăn scrapbooking scroll shapes sewing shawls shoes and sandals Singing skirt slippers slotted tool small kite fold snood Snowflake soap socks spiral rose spreuer spreuer flower spring SQUARE st patricks day Strawberry SUÉTER summer tag sweater Swiffer Sweeper Cover TABELAS DE MEDIDAS DE TRICO E CROCHE tablecloths tagged TAPETES. RECEITA tarjetas tea bag folding tea bag folding history teabag folding teabag folding history TENIS PARA BEBÊ Tết dây Thank you thanks thanksgiving quilling Thêu Tỉa hoa quả tight coil tight roll tip tips TOALHAS Tóc đẹp TOUCAS TOUCAS PARA BEBÊ Trang điểm Trang trí TRICO Túi xinh TÚNICA tunisian turkey Tutorial Tutorial video underwear Valentine's day valentines crafts valentines heart vancouver Video VÍDEO Video cắt may Video dạy móc video tutorial weaving wedding wedding dress winners winter quilling wood wreath XALE xerox lets say thanks YouTube