I hope everyone enjoys the new year. I have many, many more crochet ideas for 2010.
Thứ Năm, 31 tháng 12, 2009
Thứ Ba, 29 tháng 12, 2009
What are Your Crochet Accomplishments for 2009
What new projects did you make this year that you had never done before? Did you learn any new stitches or techniques? What is something you want to make that you have never done before?
Chủ Nhật, 27 tháng 12, 2009


Thứ Bảy, 26 tháng 12, 2009


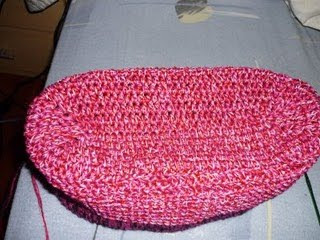
Bolsa Rosa em Croche
Usei varios fios juntos, 5 novelos de linhas
Essas linhas que usei ,normalmente usamos para croche file , agulha 1,75
Por isso usei 5 fios, com rosa, vermelho, branco e dois tipo de cereja
Comecei pelo fundo, fazendo ua corrente de 28 pontos, com agulha 4,5, eu fiz com a4,5 pq queria que ficasse bem apertado e durinha.
Mas voce pode usar a 5, depende da espessura que sao as suas linhas ou sua linha.
28 pontos baixos e no ultimo faca assim, 1 pontobaixo- 1 correntinha- e 1 ponto baixo e depois do outro lado mais ponto baixo ate o final e fazer o mesmo e ponto baixo, 1 correntinha e 1 ponto baixo, voce vai fazer contornando - formando o fundo
Faca 6 carreiras em ponto baixo , se voce ver q 6 nao sao sufientes para seu fundo faca mais
E nao esqueca q cada volta voce fara aumentos onde voce fez no final 1 ponto, 1 correntinha e 1 ponto- e bem ai que vc continuara os aumentos ate alcancar o tamanho desejado.
No meu caso 6 carreiras estavam bem pq a linha tava bem grossa.
Depois continuei fazendo em ponto rosa sem aumentar mais, assim durante 9 carreiras
Depois passei para as las, usando dupla ua la rosa e ua la preta e fiz 8 carreiras assim em ponto baixo.
Depois mais 9 carreiras em ponto rosa.
E depois voce finaliza como quer- eu fiz no meio um franzidinho e nas laterais arrematei com ponto baixo.
Na parte que eu dei o franzido, eu fiz ua carreira de ponto alto tipo rede, para passar a fita e finalizei com 2 pontos altos de um ponto baixo e assim ate o fim.
Na tira da alca fiz 6 pontos e 2 para virar -trabalhei em ponto rosa - fiz comprida pq a parte extra que esta na parte de dentro e para a pessoa usar caso deseje usar a bolsa tranversal no corpo.
Depois e so colocar fitinha e pronto, forrar e por botao e sai por ai.


Escrito e descrito pela Frida
Thứ Năm, 24 tháng 12, 2009
Thứ Hai, 21 tháng 12, 2009

Snowman Card and Some Fun at Work

Aren't these snowmen cards cute? We did something called a "Service Auction" at work. All of the managers had to offer something for bid by the employees as a way to raise money for the employee association.
My service offering was a Quilling Class. I had very little time to come up with my project, but I knew it had to include quilling. So I quickly created a snowman card and offered the class that they dubbed "Artful with Antonella" (cute, I think I will need to remember this one).
There were 2 "winners" Jaya and Prathibha. Jaya later told me that there were people who had asked her about quilling and what it was and she said that she told them a little, but was careful not to let on too much lest they outbid her - lol.
We used the card I created as our inspiration and the cards they created are truly their own.


I precut the template for the easel card using the pattern you can find on the Craftiblog (great site, I just added a link to her blog on my blogroll too).
In preparation for the class I also pre-cut paper accents and hand punched snowflakes and such so that these steps would not take up too much time. As you can see, we had so much fun stamping we didn't end up using the punches.
We sat down in the breakroom and began our class. I had selected a snowman because of the winter weather and thought we could complete the card within an hour. We ended up about 1-1/2 hours to make the cards and lots of fun by all.
I don't buy that many stamp pads, but when I do I try to find interesting ones. I selected these Tsukineko Brilliance inkpads because they actually have a shimmer to them. If you click on the pictures you can see the shimmer in the photographs.
This is a basic 2 ball Snowman pattern:
Head: 2 strips of paper, to make a Tight Roll
Body: 3 strips of paper, to make a Tight Roll
Gently push out the center of the roll to make a rounded head and body. Add Glue to the inside (bottom) of the snowman and let the glue dry.
If you notice, Prathibha added a blue strip as her second strip in the body of her snowman. You too can add some color to your snowman by replacing the 2nd white strip with the color of your choice. You can also create a snowman that is not white at all, the choice is yours, have some fun with this.
We then added an Orange triangle for his nose (I like to add the nose first and cover the center of the roll so you don't see the hole)
Googly eyes were added, because they are just too much fun - even if they sometimes give your snowman a bit of a cross eyed look - lol
3 Black crystals were added for his buttons
A piece of ribbon was cut and artisitically tied to keep him warm.
Finally his tophat was added
One of the tophats was made by cutting a strip of black paper and rolling it around your pinky and gluing it to a circular base (note: I used a hole punch to punch a hole in the circle so that the hat would perch dashingly on his head).
The other tophat used a single strip of black paper, and Prathibha folded up the bottom. We cut some strategic slits so that it would go flat and there you have it.
To keep the easel cards standing, we added 3 snowballs. As you can see, they are multi colored... use your imagination. I find when placing something to keep the card standing, that I go slightly off-center and preferrably something with some height. That is why the snowballs are stacked.
I love the personality that the cards have and the beautiful colors that were used.
What do you think you will try? I know that I will be making more of these myself, can't wait to see what they look like. :-)
Thứ Bảy, 19 tháng 12, 2009
Vintage Crochet Patterns
Do any of you use Ebay to find crochet patterns? I know I have fun bidding on the old Vintage Crochet Patterns. They are the ones that cost .10 cents back when they were new. Now they are falling apart with a price of $2.00 or more. I do have a few that my Grandma gave me and several more that I have purchased. I have noticed that the price and demand for the Magic Crochet, Crochet Fantasy and Decorative Crochet have gone up in the Ebay auctions. I really miss new issues of Magic Crochet. It had all of the thread and lace that I love to make.


